Baking with B: Banana Cupcakes with Cinnamon Frosting

KBB_baking_banana_cupcakesI normally don’t get weekends off so when I do happen to get two days of vacation in a row (it doesn’t happen often!) I try to cram as much in my schedule as humanly possible. Isn’t it funny that we use our vacation time to get things done?

So when I woke up yesterday morning and realized something had to be done with the rapidly ripening bananas in my fruit basket, I was feeling kind of frustrated and bored with everything. The solution? Whip up something a little extra-special to brighten my mood.

Banana Cupcakes with Cinnamon Frosting (yields 12)

(based loosely on the recipe found here)

1 1/2 c. all-purpose flour

1 tsp baking powder

1/2 tsp baking soda

pinch of salt

3/4 c. butter, melted

3 ripe bananas, mashed (for a total of about 1 1/2 c.)

2 large eggs

1 tsp vanilla extract

Preheat your oven to 375F. In a medium bowl, whisk together dry ingredients. Make a well in the bowl and slowly add in wet ingredients one at a time, stirring just until blended. Line a 12-muffin pan with liners. Slowly use a spoon to pour even amounts of butter in each muffin cup. Bake in the middle rack for twenty minutes.

B’s Tip: Wait until the cupcakes are completely cool before frosting, or you can end up making a runny, sticky mess with the icing.

Cinnamon Frosting

(again, loosely based on the recipe found here)

1/2 c. butter, softened

1 1/4 c. icing sugar

1 tsp ground cinnamon

1 tsp cream

Cream together butter and sugar. Add in the cinnamon; stir until completely blended. Add just enough drops of cream until it can be stirred into a smooth consistency.

The cinnamon in this frosting gives it enough of a spicy kick in the pants to cut the sweetness so you can enjoy the subtle yum of the banana cake part underneath. So far I’ve made these babies twice, and there have been no survivors.

Happy baking!

B

KBwB-Flower-50

Baking with B appears every other Monday on the Keeping Busy with B Blog. Find out why I like baking so much here. For more of my baking, click here. And for even more recipe inspiration, check out my Pinterest full of food eye candy that will have you licking your computer. Promise.

Feeling ambitious? I’ve got more cupcake recipes here, and I share my method on how I make them for the masses here.

Baking with B: Banana Muffins

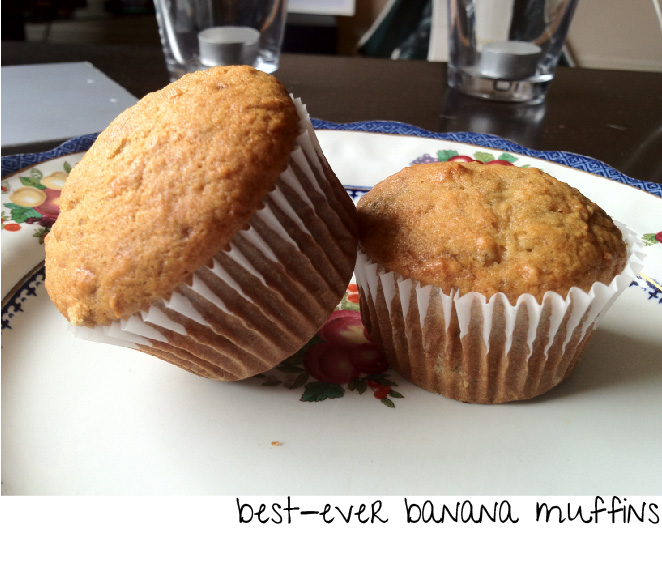
KBB_baking_banana_muffinsI don’t know anyone who doesn’t include these muffins as a staple in their baking repertoire, but if you are one of those who does not, never fear: this is probably one of the simplest recipes ever. Best of all, it’s a great way to use up those overripe bananas that are sitting in your fruit basket. Or banana tree. Or wherever you keep your bananas.

Banana Muffins (yields 12)

1 1/2 c. flour

1 tsp baking soda

1 tsp baking powder

1/4 tsp salt

1/3 c. butter, melted

3/4 c. sugar

1 egg

3 bananas, mashed (about 1 1/2 c.)

Melt butter gently in a saucepan over medium heat or in a microwave-proof bowl for 30 seconds. Let stand. In a medium-sized bowl, sift together your flour, baking powder, baking soda and salt.

In a separate bowl, mix together butter, sugar, eggs and bananas. Gradually add in flour mixture mixing well. Spoon batter into greased muffin pan, or one lined with muffin cups. Bake for about 20 minutes at 350F until tops are lightly golden. If you are making miniature muffins leave them in for only fifteen.

B’s Tip: It’s true what they say- ripe bananas have the best flavor. My saying for bananas is this: “If they’re not good enough to eat, they’re good enough to bake with.” Okay, I don’t really say that. But it is true. If your banana is covered with waaay too many black spots for your liking, use them to make these muffins. If your bananas are already starting to go but you don’t have time to make muffins, freeze them for up a month. Just remember to let them get until room temperature before mashing them and adding them to your batter. Cold bananas make all that butter you just warmed chilly again which gets you- you guessed it- chunks. No one wants butter chunks in their muffins.

These muffins are best served warm, cold, day or night- anytime! The best part about them is that they’re so versatile. Leave them as is and serve them warm with a lick of butter and a cup of tea. Or why not create your own variation? Add in 1/2 c. of your favorite nuts to the batters before scooping it into the muffin cups. I think walnuts go amazingly with this recipe. Or why not add chocolate chips? (Everyone’s favorite.) A co-worker of mine made these the other day with butterscotch chips and they tasted really good as well.

Happy baking!

B

KBwB-Flower-50

Baking with B appears every other Monday on the Keeping Busy with B Blog. Find out why I like baking so much here. For more of my baking, click here. And for even more recipe inspiration, check out my Pinterest full of food eye candy that will have you licking your computer. Promise.

Baking with B: Lucy’s Chocolate Chocolate Cake


KBB_chopped_chocolate

Somehow (somehow!) I was roped into making a birthday cake for one of the office staff.

Okay. So it wasn’t really that hard to convince me. And when my co-worker Lucy requested that her cake could be anything that was “chocolate chocolate” (that is, chocolate cake with chocolate icing), I was totally game.

And don’t even try to tell me that it should be “double chocolate”. She asked for “chocolate chocolate” and I think I delivered.

KBB_baking_chocolate_chocolate_cakeLucy’s Chocolate Chocolate Cake (serves 8)

2 oz./55g semisweet chocolate, chopped

2 tbsp milk

1 1/2 c. all-purpose flour

1 tbsp baking powder

3/4 c. unsalted butter, softened

generous 1/4 c. dark brown sugar

3 eggs, beaten

1 tsp vanilla extract

Filling and Frosting

31/2 oz./100 g semisweet chocolate, chopped

4 tbsp unsalted butter, softened

1 1/2 c. icing sugar

1 tsp vanilla extract

1 tbsp milk

Preheat the oven to 350F. Grease a 9-inch round cake pan and line with parchment paper.

First, take a picture of the chopped chocolate and post it on Instagram just to be a huge tease. When you’re done gloating about how many likes your picture got (you’re welcome), gently heat the chocolate and milk in a saucepan just until melted, without boiling. Remove from heat.

Sift the flour and baking powder together and add the butter, brown sugar, eggs and vanilla extract. Beat well until smooth, then stir in the melted chocolate mixture.

Spoon the batter into pan smooth level. Bake for 50-60 minutes, or until firm to the touch and just beginning to shrink away from the sides of the pan.

Let cool in the pan for 10 minutes, then turn out onto wire racks to finish cooling. When cold, carefully slice the cake horizontally into 2 layers.

B’s Tip: For the love of all that is good, please test all your willpower and do not try to cut the cake before it has cooled! I learned that the hard way- my first round of this cake got totally smooshed.

For the filling and frosting, melt the chocolate with the butter in a small pan over low heat. Remove from the heat and stir in the confectioner’s sugar, vanilla extract, and milk, then beat well until smooth.

Sandwich the cake layers together with half the chocolate mixture, then spread the remainder on top of the cake, swirling with a spatula. Sprinkle with leftover grated chocolate, if desired.

I substituted milk with cream with no difficulties (so sue me, I was all out!) and instead of a layered option I used the extra icing to frosting the sides of the cake as well. The result? A rich, chocolatey cake with a dense, moist texture. It keeps in the fridge wonderfully if you’re making it ahead of time- just remember to cover with tin foil and let rest at room temperature a few minutes before serving.

Lucy said that it was everything she wanted and the rest of the office seemed pleased as punch, too. Considering my first stab at this recipe turned out a disaster, I was pretty happy with the results too. I’m definitely not waiting until Lucy’s next birthday to try this cake again!

Happy baking!

B

KBwB-Flower-50

Baking with B appears every other Monday on the Keeping Busy with B Blog. Find out why I like baking so much here. For more of my baking, click here. And for even more recipe inspiration, check out my Pinterest full of food eye candy that will have you licking your computer. Promise.

How Do You Cope with Stress?

Lately it seems like every little thing under the sun has the capacity to stress me out. I call this feeling “the octopus” because once you start feeling anxious about one thing, those tentacles of anxiety reach out and grab anything else orbiting around your mind. Suddenly, one minor issue has turned into several and you’re no longer sure which one originally caused the churning feeling in your stomach.

In situations such as these, I have a favorite stress reliever that I usually turn to. Some of my more stressful moments have manifested themselves into these creations below. Can you guess what I like to do when I’m stressed out?

 photo

It may not be so good for the waistline, but I’ve found it to be a (relatively) healthy and productive way of dealing with my workload. The satisfaction that comes with creation is surprisingly soothing!

How do you cope with all of your stress?

KBwB-Flower-50

When I’m not eating my own body weight in cookies, you can also find me dealing with my stress by tuning out with a good book. Read about more of my selections here or follow me on Goodreads so you can creep my virtual bookshelves. Interested in my favourite stress relief method? Choose your poison here.


Baking with B: Chocolate Brownies

Happy Valentine’s Day to all my readers!

Hey. I love you guys all so much. Thank you for supporting my blog. I’m rewarding you today because it’s a) Valentine’s Day (duh); and b) because it’s coincidentally Friday, which means that this is kind of like the solar eclipse of holidays.

Chocolate Brownies (yields 12)

1/4 c. cocoa powder

1/3 c. butter

1 c. sugar

3/4 c. flour

2 eggs

pinch of salt

In a small saucepan add together cocoa and butter. Begin to melt butter at a low temperature, stirring every so often to combine the melting butter with the cocoa powder. Meanwhile, in a mixing bowl add eggs, sugar, flour and salt. Don’t mix yet! When the butter and cocoa is melted, pour over ingredients into mixing bowl. Stir just enough to combine everything without any lumps, then pour batter into a 9×9-inch into the middle comes out clean. Let cool in pan before cutting into squares.

B’s Tip: I know it’s tempting, but wait until the brownies are completely cool before cutting them! If they’re too hot, the batter will have not set and you’ll end up with a gooey mess that will be delicious, but it won’t be a brownie.

This brownie has a cake-like texture and a chocolatey flavour that isn’t too overhwelming, so it’s perfect for add-ins. You may want to try adding some nuts to the batter, or just smearing with your favourite frosting. Delicious!

Happy baking!

B

KBwB-Flower-50

Baking with B appears every other Monday on the Keeping Busy with B Blog. Find out why I like baking so much here. For more of my baking, click here. And for even more recipe inspiration, check out my Pinterest full of food eye candy that will have you licking your computer. Promise.

Chocolate not your thing? No worries. I’ve got a butterscotch version here. Follow a vegan diet? I’ve got you covered too.