Baking with B: 7 Days of Christmas Cookies: Chocolate Crinkle Cookies

18bfp-7cookies1-092

There used to be this coffee shop down the street from my apartment that used to have not only amazing gelato and lattés, it also had one of my favourite treats ever. For a not-quite-vegan like myself, I was shocked to learn that these babies have no dairy in them whatsoever.

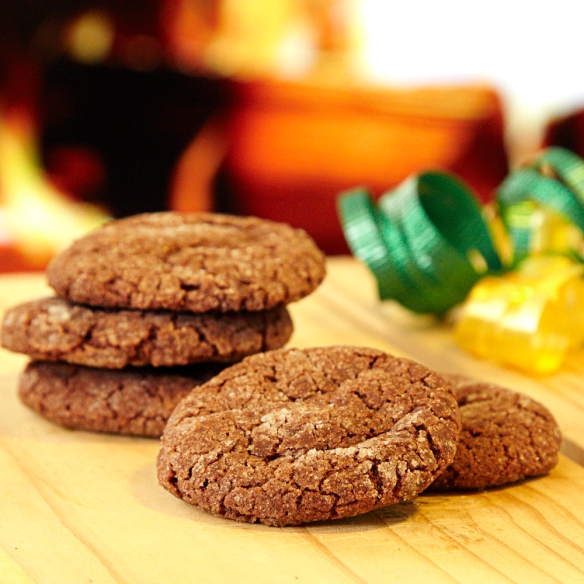
Chocolate crinkle cookies: great around Christmas time, great around any time. They look crunchy because of the way the broken cookie crust outer layer, but the inside is moist and dense and chewy and oh-so-good. Excuse me while I wipe the drool off of my screen.

Buying all these cookies was becoming kind of a problem for me, so I did some searching until I found this recipe from clockworklemon.com. They’re the closest I’ve come to finding a recipe that matched the ones they make in the café so now I can make them at home just to make things a little easier on my wallet.

Vegan-Friendly Chocolate Crinkle Cookies (makes approximately 24 cookies)

3/4 c. sugar

1/3 c. vegetable oil

2 tbsp corn syrup

1 tsp vanilla extract

1/3 c. soy milk

1 tbsp ground flax seeds

powdered sugar and granulated sugar

4 oz (about 1/2 a cup) semisweet chocolate chips, melted

1 1/4 c. + 2 tbsp all purpose flour

2 tbsp cocoa powder

3/4 tsp baking powder

1/4 tsp salt

In a bowl, mix together sugar, oil, corn syrup, vanilla, soy milk, flax seeds, and melted chocolate until smooth. Sift in the flour, cocoa, baking powder and salt. Mix until thick dough forms. Chill the dough in the fridge for 15 minutes. In the meantime, pour granulated sugar onto a plate and powdered sugar on another. When dough is ready, roll into balls approximately the size of a tablespoon and roll them in the granulate sugar, then the powdered sugar. Place cookies on a parchment-lined cookie sheet approximately 2 inches apart and bake at 325F for about 14 minutes. Let cookies cool on tray about five minutes before transferring them to a cooling rack.

B’s Tip: Soy milk not your thing? I substituted for almond milk and it tasted just fine. You could also could try rice milk- let me know what works for you!

If you’re doing something for Santa, why not make these to serve with a glass of milk? Or maybe he’d like them after a light lunch, with his favorite espresso-based drink? Soy lattés are my poison of my choice. I mean his poison of choice. I mean…whatever.

Happy baking!

B

KBwB-Flower-50

I’m counting down Christmas by sharing some of my favourite holiday cookie recipes with you! This is the last day I’m posting my cookie recipes, but for more inspiration, you can check out more of my baking here. For even more recipe inspiration check out my Pinterest full of food eye candy that will have you licking your computer. Promise.

Baking with B: 7 Days of Christmas Cookies: Vanilla Horns

18bfp-7cookies1-069

Out of all the cookie recipes I have posted in this past week, this is probably the simplest cookie ever. People will be amazed when you tell them that it doesn’t even have sugar in the dough, so feel free to indulge as much as you like.

Vanilla Horns (makes approximately 36 cookies)

2 1/4 c. all-purpose flour

1 c. butter, softened

1 tbsp vanilla extract

granulated sugar

Cut the flour, butter and vanilla together until granular. Knead lightly together. Cover with plastic wrap and refrigerate for at least one hour.

When you are ready to bake your cookies, preheat the oven to 350F. Roll dough into logs that are approximately 3 inches thick and that are slightly thicker in the middle. Bend into crescent moon shapes (these are the horns!) Place on a parchment-lined cookie sheet and bake in the center of the oven for approximately 12 minutes.

Once the vanilla horns are out of the oven, let them cool off slightly (but not too much!) and dip them in the sugar until they are covered. Let cool off on a cooling rack.

B’s Tip: To make it easier to dip the cookies, use a soup bowl or a rimmed plate to hold the granulated sugar. You may even want to set cookie in the sugar and sprinkle more over top using a tea spoon to ensure even coverage.

Even though they aren’t that sweet, these cookies are so buttery and melt-in-your-mouth good you won’t even notice. The simple decoration using granulated sugar makes these cookies look as if they’ve been dusted in the lightest sparkle of snow. Just beautiful!

Happy baking!

B

KBwB-Flower-50

I’m counting down Christmas by sharing some of my favourite holiday cookie recipes with you! I’ll be posting a different Christmas cookie recipe every day for the next seven days so you can follow along in my family’s baking tradition, and have more cookies to add to your Christmas baking arsenal! For more inspiration, you can check out more of my baking here. For even more recipe inspiration check out my Pinterest full of food eye candy that will have you licking your computer. Promise.

Baking with B: 7 Days of Christmas Cookies: Orange Crunch Cookies

18bfp-7cookies1-064

Although I live in Canada and there is nary an orange tree in sight, I still manage to think of Christmas when I think of orange-y flavors. Maybe it’s because there’s always a clementine in the toe of my stocking. Or maybe it’s because it’s been a long-standing joke in my family that we give my dad a Terry’s Chocolate Orange from a “mystery person” every year. Or maybe I just like orange because it pairs so nicely with all those Christmas spices. And chocolate. Man, does it ever taste good with chocolate.

Orange Crunch Cookies (makes approximately 24 cookies)

1 c. all-purpose flour

1/4 c. butter, diced

1/3 c. soft dark brown sugar

1/2 egg yolk, beaten

1 tbsp honey

1 tsp orange zest

Icing:

1 c. icing sugar

3 tbsp orange juice

Sift flour in a bowl and rub diced butter into it until it forms a bread crumb-like texture. Using a table knife, stir rest of ingredients in the flour until mix forms clumps. Working with your hands, work dough into a small ball. Roll into log and wrap in plastic wrap. Chill for 1 1/2 hours or until firm.

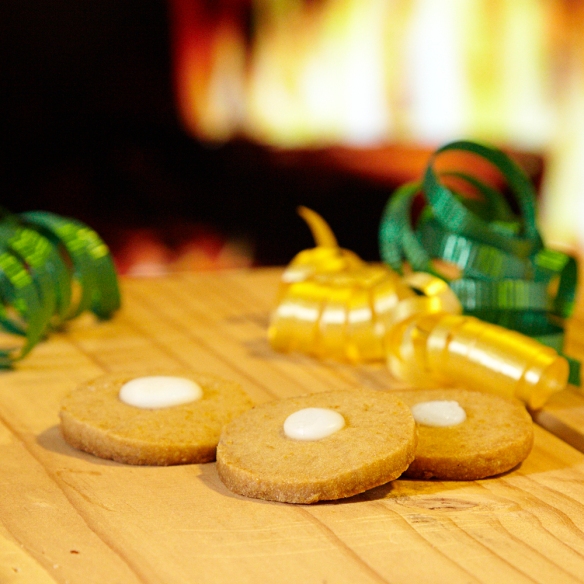
Preheat your oven to 350F. Slice log of dough into thin discs and place on a parchment-lined or lightly greased cookie sheet. Bake 7-9 minutes and allow cookies to set a bit on the pan before transferring them to a cooling rack.

While the cookies are baking, you can make the icing. Beat sugar and orange juice together to form smooth paste. Pour into a piping bag and drizzle over cooled cookies.

B’s Tip: To create orange zest you can use a zester or you can grate the orange lightly on either a tabletop or hand-held cheese grater. Just make sure you don’t start grating what’s called the “pith”- the stringy white stuff that’s underneath when you peel an orange. Including that in your recipe will diminish the sweet orange flavour that’s coming from the peel and instead just make it bitter.

Instead of drizzling with orange icing, why not try dipping cooled cookies into melted chocolate or drizzling with a chocolate ganache? Better still, leave cookies as-is so they can act as the perfect dippers in a mug of your favourite hot chocolate.

Happy baking!

B

KBwB-Flower-50

I’m counting down Christmas by sharing some of my favourite holiday cookie recipes with you! I’ll be posting a different Christmas cookie recipe every day for the next seven days so you can follow along in my family’s baking tradition, and have more cookies to add to your Christmas baking arsenal! For more inspiration, you can check out more of my baking here. For even more recipe inspiration check out my Pinterest full of food eye candy that will have you licking your computer. Promise.
Baking with B: 7 Days of Christmas Cookies: Rugulahs

18bfp-7cookies1-059

Are you ready for a cookie challenge? Because let me tell you, these rugalahs are a challenge. My family and I first tried these when we ended up celebrating Hanukkah with some family friends years and years ago. Even after we fell out of touch with them, this rugalah recipe shows up periodically in our Christmas cookie repertoire. I’m not sure if it’s more traditional to make them with the sticky jam filling or the chocolate but I’ve included both here so you can take your pick! Or why not go all out and do both? It is Christmas after all!

Rugalahs (makes 48 pastries)

Pastry:

2 c. all-purpose flour

1/2 c. butter

8 oz. (240 g) cream cheese

1 egg


Chocolate Filling

I c. bittersweet chocolate, finely chopped

1/4 c. granulated sugar

2 tbsp cocoa powder


Jam Filling

1/2 c. raspberry or apricot jam

1/2 c. brown sugar

1/2 c. finely chopped walnuts (optional)

2 tbsp cinnamon

2 tbsp cocoa powder


Glaze:

1 egg, beaten

1/4 c. granulated sugar

To make pastry: Place flour in a bowl and cut in butter until you achieve a texture of coarse crumbs. (You may want to use a pastry blender if you’re lucky enough to have one!) Stir in cream cheese and egg, just until dough forms a ball. Turn out onto a work surface and knead gently a few times until smooth. Wrap the dough in plastic wrap and chill for at least 2 hours.

When you are ready to make your cookies, divide dough into quarters. On a lightly floured surface, roll it out until it is about a 1/4″ thick circle (the thinner you roll the dough, the crispier the pastry).

To make the jam filling: Spread 2 tbsp of jam over entire circle. In bowl, combine brown sugar, walnuts, cinnamon and cocoa. Sprinkle 1/4 of the mixture over the jam.

To make the chocolate filling: Combine chopped chocolate, cocoa in sugar in a small bowl. Sprinkle 1/4 of mixture over each pastry circle.

To roll up the cookies: Cut one pastry circle into 12 wedges; roll up each wedge tightly, starting at the outside wedge. Place on greased baking sheet with tip of crescent on the bottom. Brush with egg, then sprinkle with sugar. Repeat with remaining dough and fillings.

Bake the cookies in a preheated 350F oven for about 30 minutes or until a deep golden brown. Remove to rack to cool.

B’s Tip: Pizza cutters aren’t just for pizza! Use to cut the dough into wedges for a sleek line that will ensure the dough doesn’t break the same way a regular knife would. No pizza cutter? Try dipping the knife briefly into cold water or refrigerate it briefly for a smoother cut.

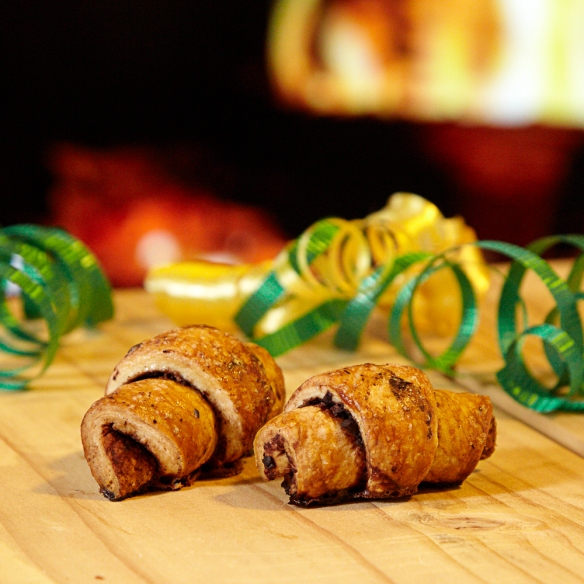
These cookies not only look incredibly complicated and therefore will impress all your friends and family during Christmas, they also look beautiful- like a croissant in cookie form! Reduce the measurements for fillings so you can experiment with the same batch of pastry and figure out which are the ones you like the best.

Go ahead, try them! I dare you. And while you’re in the mood, maybe you could make some of those amazing latkes. If you do that, I just might need your number!

Happy baking!

B

KBwB-Flower-50

I’m counting down Christmas by sharing some of my favourite holiday cookie recipes with you! I’ll be posting a different Christmas cookie recipe every day for the next seven days so you can follow along in my family’s baking tradition, and have more cookies to add to your Christmas baking arsenal! For more inspiration, you can check out more of my baking here. For even more recipe inspiration check out my Pinterest full of food eye candy that will have you licking your computer. Promise.
 

Baking with B: 7 Days of Christmas Cookies: Jam Slices

18bfp-7cookies1-084

My mom used to make these pretty little cookies all the time when I was little, but I don’t ever remember appreciating them as much as I do now. They look really fancy, but they’re much easier to make than you think. Include these cookies on your Christmas platter and you are guaranteed to please even the biggest sweet tooth in the crowd. I should know, because these are my dad’s favourites.

Jam Slices (makes approximately 36 cookies)

1 c. butter, softened
2/3 c. sugar
2 eggs
2 1/4 c. all-purpose flour
1 tsp baking powder
3-4 tbsp any red jam

Glaze:

3/4 c. icing sugar

1 1/2 tbsp water

In a large mixing bowl, cream the butter and sugar until fluffy. Beat in the eggs one at a time. In a separate bowl, combine flour and baking powder together and add to wet ingredients, mixing well.

Preheat the oven to 400F. Divide dough into four pieces. Roll each section of dough into four logs that are abut 16 inches in length (almost the whole length of the cookie sheet, with ample room on either side). Using two fingers, make an indentation down the middle of each log so it almost looks like a moat. Fill each “moat” with your jam. Bake on the center oven rack for about 15 minutes.

While they’re baking, mix together the glaze, adding a little bit of water at a time so the icing sugar becomes runny, but not clear. Remove jam logs from oven. Leave the pan to let them cool down a bit, then drizzle the glaze over each log while still warm. Slice diagonally to make cookies that are approximately 3/4 wide (measuring a little over half of the span of your finger).

B’s Tip: Make sure you use a good quality jam for this recipe as the thicker the jam is, the better it will turn out. You may want to mash jam with a fork beforehand to ensure there are no giant pieces of fruit around to interfere with the aesthetic of the cookie.

Strawberry or raspberry jam works best with this recipe, but you may want to experiment with different flavors (apricot is one of my favorites.) Make sure you slice cookies when they are still warm to avoid them breaking. Store separately from other harder cookies to make sure the moist jam doesn’t interfere with the texture.

I love having one or two (or four!) of these cookies with a strong cup of coffee for a mid-morning break. I may just go have one right now!

Happy baking!

B

KBwB-Flower-50

I’m counting down Christmas by sharing some of my favourite holiday cookie recipes with you! I’ll be posting a different Christmas cookie recipe every day for the next seven days so you can follow along in my family’s baking tradition, and have more cookies to add to your Christmas baking arsenal! For more inspiration, you can check out more of my baking here. For even more recipe inspiration check out my Pinterest full of food eye candy that will have you licking your computer. Promise.

Baking with B: 7 Days of Christmas Cookies: Maple Butter Cookies

18bfp-7cookies1-053

If you’re too worn out from all of the holiday excitement, may I suggest making these super simple cookies to add to your Christmas cookie platter? I came up with this recipe after wanting to be creative with my basic butter cookie recipe that I make every year. I already had the maple flavoring in my baking box and it adds a subtle element to the buttery, melt-in-your-mouth texture of the cookie. Tinker around with the flavor to see what suits you the best.

Maple Butter Cookies (makes approximately 36 cookies)

3/4 c. butter, softened
1 3/4 c. all-purpose flour
1/2 c. sugar
about 1 tbsp maple extract or 2 tbsp maple syrup (to taste)

In a mixing bowl cream together butter and sugar. Add flour a little bit at a time as the dough gets quite thick and difficult to manipulate. You may want to use a food processor. Add maple extract to taste. Knead until a large ball starts forming, then flatten the ball into a disc. Cover and refrigerate for 30 minutes.

When you’re ready to make your cookies, preheat the oven to 350F. Remove dough from refrigerator and roll into small balls. Place on a parchment-lined cookie sheet. Before placing them in the cover, press down on the top of each ball of dough lightly with a fork. Bake for about 10 minutes.

B’s Tip: To make sure all of your cookies are in uniform shape, use a small dessert spoon (or I like to use a coffee spoon) to scoop the same amount of dough. Roll into a ball using the palm of your hands.

Let cookies cool on a cooling rack for about ten minutes before serving to let the shape of the cookie set. You may wish to drizzle an icing glaze over the top for a sweeter cookie, and if you really love that maple flavor you may wish to add a drop of maple extract to your icing as well. I pressed chopped walnuts into the top and that tasted great too!

If you can’t find maple extract in the aisle where vanilla extract is sold, you may want to try experimenting with maple syrup. Just remember to add a little bit at a time so the dough doesn’t become too sticky.

This cookie pairs perfectly with a cup of Christmas tea.

Happy baking!

B

KBwB-Flower-50

I’m counting down Christmas by sharing some of my favourite holiday cookie recipes with you! I’ll be posting a different Christmas cookie recipe every day for the next seven days so you can follow along in my family’s baking tradition, and have more cookies to add to your Christmas baking arsenal! For more inspiration, you can check out more of my baking here. For even more recipe inspiration check out my Pinterest full of food eye candy that will have you licking your computer. Promise.
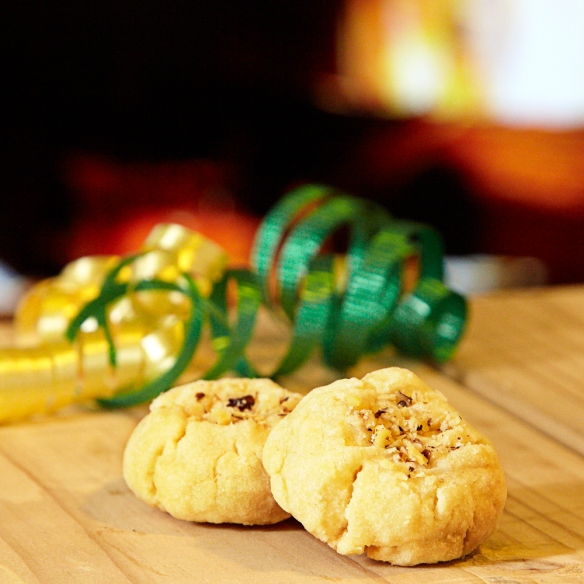
 

Baking with B: 7 Days of Christmas Cookies: Traditional Swedish Gingersnaps

18bfp-7cookies1-073

Do you find yourself scrambling to figure out what to make leading up to the Christmas holidays? Me too. It’s not so much a matter of not knowing what to serve- it’s having to pick and choose! There are so many tasty ideas for holiday foods out there- but what really gets me going is all that Christmas baking.

Part of my background is Swedish so holiday baking is a huge must in our family. It’s a tradition every year around Christmastime to bake seven different kinds of cookies. Why this is a tradition I have no idea but I can’t complain- I love to bake and I love to eat, so everybody wins as far as I’m concerned!

As we begin our countdown to Christmas, I’ll be sharing seven of some of my favorite cookie recipes so that you can get some ideas on what to bring- and what to eat- at your upcoming holiday dinner.

So to kick off our cookies we’re going to start with the traditional Swedish gingersnap, or pepparkakor. It’s much spicier and a little less sweet than its North American counterpart, but is still incredibly satisfying when paired with your favourite after-dinner holiday drink, a strong cup of coffee, or just an old-fashioned glass of milk.

Swedish Gingersnaps (makes approximately 48 cookies)

7 tbsp butter, softened

1 c. dark brown sugar

1/2 c. dark corn syrup (light works too)

1/2 c. whipping cream

2 tsp ginger

2 tsp cinnamon

2 tsp ground cloves

3 1/2 c. all-purpose flour

2 tsp baking soda

Cream the butter and sugar together. Add the corn syrup and beat until light and fluffy. Pour in whipping cream and spices. In a separate bowl combine the flour and baking soda.  Add into the wet mixture and knead until smooth (you may want to use your hands). Roll dough into ball and wrap in plastic wrap. Let rest at room temperature overnight.

When you’re ready to bake your cookies preheat the oven to 350F. Roll the dough out onto a floured surface. Cut into shapes and place on a cookie sheet covered in parchment paper. Bake on the center oven rack for around 8 minutes.

B’s Tip: If you prefer your cookies to be chewier, don’t roll out the dough as thinly. Thinner dough leads to crispy cookie, so roll away if that’s what you prefer. You may want to shorten the baking time to avoid burning. Beware- getting a little too rolling-pin happy might mean your shapes won’t cut very well.

Don’t worry if the gingerbread cookies look puffy and soft when they come out of the oven. Place a cooling rack to let them cool and harden slightly before icing.

These gingerbread cookies look beautiful when iced with all-white icing but you may want to experiment with different colours to determine which you like best. Or why not go all out and add sprinkles, Smarties or mini gum drops to create that perfect candy-coated look?

Happy baking!

B

KBwB-Flower-50

I’m counting down Christmas by sharing some of my favourite holiday cookie recipes with you! I’ll be posting a different Christmas cookie recipe every day for the next seven days so you can follow along in my family’s baking tradition, and have more cookies to add to your Christmas baking arsenal! For more inspiration, you can check out more of my baking here. For even more recipe inspiration check out my Pinterest full of food eye candy that will have you licking your computer. Promise.


Baking with B: Honey Cakes

9BFP-HoneyCakes-SQ1000

Raise your hand if you don’t like honey. No one? No one? Bueller?

Ok, even if you’re one of those crazy people who does not like the taste of honey (I’m not judging, I promise) please consider giving these a try anyway. The name of the recipe makes these little cakes sound a lot more sickly-sweet than they actually are. In reality, they’re moist and cakey with a hint of fruit flavor that will have you more obsessed with honey than Winnie the Pooh.

Eat them in the morning with fresh fruit, take them with tea in the afternoon, or slather them with marzipan for a tasty dessert. You won’t regret any of it.

Honey Cakes (makes 6)

½ stick butter

¼ c. packed light brown sugar

4 tbsp honey

1 egg

½ tsp vanilla

2 tbsp apple puree

2/3 c. self-rising flour

½ tsp ground cinnamon

¼ tsp ground ginger

Preheat the oven to 350F. Line a muffin pan with 6 baking cups. Put the butter and sugar in a mixing bowl. Pour in the honey and beat everything together until fluffy. In another bowl, beat the egg, vanilla and apple puree, then beat into this butter mixture. Sift over the flour, cinnamon and ginger. Now fold the dry ingredients by running your spatula around the outside of the bowl and across the middle until everything is well mixed. Fill the baking cups with the mixture. Bake for 18-22 minutes, until risen, golden and firm to the touch. Leave to cool on a wire rack.

Happy baking!

B

KBwB-Flower-50

Baking with B appears every other Monday on the Keeping Busy with B Blog. Find out why I like baking so much here. For more of my baking, click here. And for even more recipe inspiration, check out my Pinterest full of food eye candy that will have you licking your computer. Promise.

Baking with B: Classic Plum Pie

KBB_baking_plum_pieI guess it’s that time of year again where it starts to feel like fall and I’m all about the pie, as evidenced in this whopper of a recipe post here.

So while I’m in the mood for pie I thought I’d share my makeshift recipe for plum pie. It’s a revival from Thanksgiving a couple of years back when I decided that seeing as my family doesn’t really celebrate Thanksgiving (both of my parents come from European families) the most logical thing to do was to concoct an elaborate meal complete with this fancy-looking dessert.

I say fancy-looking because pie always looks fancy, but notice I didn’t say hard. Once you get the hang of making your own crust (see the recipe on how to make one from scratch here) your biggest dilemma is going to be figuring out what you want to fill your pie with. Or take the easy way out and just fill your favorite store-bought pie crust with this tasty filling. Go ahead. No one is judging you.

Perfect Plum Pie (serves 8)

Crust:

Recipe for homemade pie crust here or use store-bought

Filling:

¾ c. packed brown sugar

3 tbsp cornstarch

1/8 tsp salt

12 large plums, sliced

1 tbsp fresh grated ginger

1 tbsp cold unsalted butter, cubed

B’s Baking Tip: If you’re using my homemade pie crust recipe, follow the instructions as listed here to make the crust. If you’re using store-bought, use the guidelines on the package to prep and cook your pie crust.

To make the filling, combine brown sugar with cornstarch and salt in a large bowl. Stir in plums and ginger until evenly coated. Distribute fruit mixture evenly along bottom of pie dish. Top with cubes of butter. Bake in lower third of oven until crust is golden and plums are tender, about 35-45 minutes.

Happy baking!

B

KBwB-Flower-50

Baking with B appears every other Monday on the Keeping Busy with B Blog. Find out why I like baking so much here. For more of my baking, click here. And for even more recipe inspiration, check out my Pinterest full of food eye candy that will have you licking your computer. Promise.

Baking with B: Classic Apple Pie

KBB_classic_apple_pie

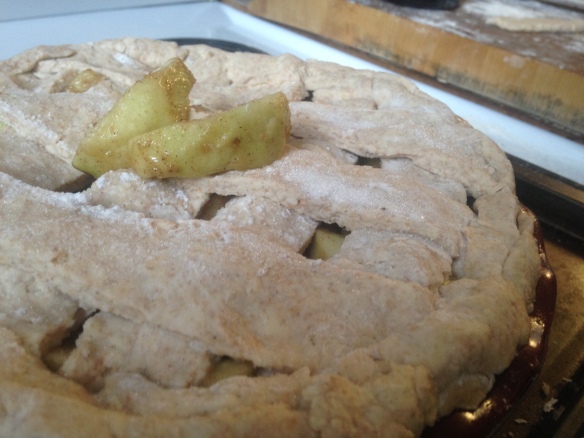
This one may seem a little intimidating to the novice bakers out there, but trust me when I say that baking a pie from scratch has to be one of the most satisfying things out there. There’s nothing like the feeling of pulling a pie- an actual pie that you made- out of the oven and realizing that it’s not rocket science. You don’t have to be a master pastry chef.

Time. Patience. Effort. Those are the ingredients that you need to make a great pie. (You also may want to stock up on some of the actual food-related ingredients listed below.) And trust me, this classic apple pie is so worth it. Once you’ve mastered the crust, I encourage you to try other fruits but this is best enjoyed RIGHT NOW when apples are in season and found in multitudes at the stands along the country roads.

Classic Apple Pie (serves 10)

Crust

3 ½ c. all-purpose flour

2 tbsp granulated sugar

½ tsp salt

¾ c. very cold butter cut into ½” pieces


Filling

6 large tart apples

½ c. firmly packed brown sugar

2 tbsp all-purpose flour

1 tsp ground cinnamon

1 tsp vanilla extract

B’s Tip: Get yer apron on, tie yer hair back and get all your supplies together. Making a pie crust and pie filling from scratch requires being organized and methodical, but you can do it. Yes you can. I don’t normally number the steps in my recipes because they’re usually pretty simple, but I’ve labeled them here for your convenience. Hope it helps!

  1. In a large mixing bowl, combine 2 ½ c. of the flour, the granulated sugar and salt. Stir until well blended.
  2. Drop the butter pieces into the flour mixture. Using a pastry blender or table knives, work butter and flour together in a chopping motion. If using 2 knives cut in by drawing the knives in opposite directions through the butter and flour mixture. Scrape off the excess batter that clings to knives. Keep cutting in the butter until the mixture looks like coarse crumbs with only very small pieces of butter visible.
  3. Pour the cold water over the top of the flour-butter mixture. Using the wooden spoon, stir gently until the mixture forms moist crumbs. Dump your crumbs onto a work surface. Divide into 2 equal piles. Using your hands, press each pile of crumbs into a flat disk. Wrap the disks up in plastic wrap and put in fridge until well-chilled, for at least 30 minutes, or for as long as 2 days.
  4. Make the apple filling: Cut apples into slices (1/2” thick). Pile slices into mixing bowl. Add brown sugar, flour, cinnamon and vanilla. Stir until well-blended.
  5. Remove dough from refrigerator. Set 9” pie dish on baking sheet. Preheat oven to 450F.
  6. Sprinkle work surface with little of remaining flour and set rest aside. Unwrap one disk of dough and set it in the middle of floured surface. Using rolling pin press gently on disk to flatten slightly.
  7. Sprinkle the top of the dough with a little more of the flour. Place the rolling pin on the center of the dough. Using a little pressure, roll the pin over the dough to the far outer edge. Give the dough a little turn to the right, sprinkle with more flour and starting from the center, roll again. Repeat the turning, flouring and rolling until you have a large round circle about 14” in diameter. If the dough begins to stick, slide the long metal spatula underneath to loosen it, and sprinkle both sides of the dough circle with a little flour.
  8. Move the baking sheet close to the dough circle. Loosely wrap the dough circle around the rolling pin. Holding the rolling pin, lift the dough over the pie dish. Slowly unroll the dough so it covers the dish and hangs over the edges.
  9. Using fingertips, gently press dough into dish. Pile in apple filling.
  10. Repeat rolling steps 6-7 for top and transfer on as in step 8.
  11. Press edges of top and bottom dough using knife or scissors cut away excess gently, leaving 1” border. Roll the border of dough under itself so that it rests on top of dish rim.
  12. Pinch all around pie edge with thumb and forefingers. Using sharp knife, cut 3 small slits into top crust.
  13. Bake pie on baking sheet until the top is brown and the apples are tender, about an hour. Test the pie by inserting a knife in one of the slits and into an apple slice. If it glides in, it is done. Cool on rack.

Happy baking!

B

KBwB-Flower-50

Baking with B appears every other Monday on the Keeping Busy with B Blog. Find out why I like baking so much here. For more of my baking, click here. And for even more recipe inspiration, check out my Pinterest full of food eye candy that will have you licking your computer. Promise.