7 Days of Christmas Cookies: One-Dough Wonders

A few years back I started sharing my family’s Swedish tradition of making seven different types of cookies at Christmastime and since then it’s kind of taken off- in my personal life, at least. I guess there were a lot of people IRL that didn’t realize that I baked, or that I baked that much around this time of year.

I started off by sharing some traditional Swedish favourites (with a few thrown in for variety). They were: traditional Swedish gingersnaps, maple butter cookies, jam slices, rugulahs, orange crunch cookies, vanilla horns and chocolate crinkle cookies.

The next year I found myself strapped for baking time and decided to do a “no-baking” theme for my cookie selection. (Okay, so maybe one of them you had to bake in the oven- but it still cuts down on the work!) Those recipes included Butterscotch Bars, Midnight Mints, Chocolate Roll, Date Pecan Bars, Marshmallow Roll, Pineapple Log, and Butterscotch Confetti.

So you’re probably wondering what on earth it is I’m going to do with all this:

Well, I’ll tell you what I’m going to do: this year I’m using the same vanilla dough base (with a couple of add-ins) and all of the ingredients you see above to make seven unique kinds of cookies that you can serve at any time of year, really. Once you got the dough down pat (recipe to follow), you can build yourself a collection of cookies that are surprisingly diverse in flavor (considering they’re all made from the same dough!).

One-Dough Wonder Vanilla Cookie Dough

(yields 5-10 dozen cookies depending on recipe)

3 c. all-purpose flour

3/4 tsp. baking powder (omit if making thumbprint cookies)

1/2 tsp. salt

1 c. unsalted butter

1 c. sugar

1 large egg

2 tsp. vanilla extract

Whisk together flour, baking powder and salt in a large bowl. Beat butter and granulated sugar until pale and fluffy. Beat in egg and vanilla. Add flour mixture and beat until combined. Dough can be covered in plastic wrap and chilled up to 2 days.

I can’t wait to show you some of the tasty treats I’ve come up with just by using this simple cookie dough. Stay tuned!

Happy baking!

B

I’m counting down Christmas by sharing some of my favourite holiday cookie recipes with you! I’ll be posting a different Christmas cookie recipe every day for the next seven days so you can follow along in my family’s baking tradition, and have more cookies to add to your Christmas baking arsenal! For more inspiration, you can check out more of my baking here. For even more recipe inspiration check out my Pinterest full of food eye candy that will have you licking your computer. Promise.

Baking with B: Classic Rice Pudding with Fresh Raspberries

If any of you follow me and the saga of my porch garden on Instagram you’ll know that I have a couple of raspberry plants that over the summer have produced the occasional fruit. (To be honest, I didn’t have high expectations to begin with so I was happy I got any berries at all.)

Well, wouldn’t you know, mere days before October arrives, these little plants decide to wake up and grow raspberries like there’s no tomorrow. They’re pretty teensy and tart, but there’s a fresh crop coming out each day. However, I still didn’t have quite enough to bake with so I had to rack my brain to figure out what I could do with them.

Enter rice pudding: one of the greatest desserts to make when you have practically nothing in your pantry and you’re craving something sweet. It’s creamy with a hint of vanilla and it’s the perfect delivery method for sweet-tart raspberries (although really, I think any fruit will do).

Oh, and did I mention it’s actually pretty easy to make? See what I mean for yourself…

Classic Rice Pudding with Fresh Raspberries (makes approx. 4 servings)

(loosely based on the recipe found here)

3/4 c. uncooked white rice (short or medium grain is best)

2 c. milk

2 tbsp vanilla custard powder

1/3 c. white sugar

1/4 tsp salt

1 egg, beaten

1 tbsp butter

raspberries, to taste (or fruit of your choice)

Note: I used vanilla custard powder in this recipe because it gave me such a rich, creamy vanilla flavor. The original recipe suggests adding 1/2 tsp vanilla extract at the very end, which is perhaps a little more traditional than my method.

In a medium saucepan, bring 1 1/2 c. of water to boil. Add rice and let simmer on low, covered for approximately 20 minutes.

Whisk custard powder in with milk until dissolved. In a separate saucepan, bring 1 1/2 c. of milk to a slow boil, stirring occasionally to prevent scalding. Add in cooked rice and sugar, stirring to combine. Let simmer on low for 15-20 minutes until texture becomes quite thick.

B’s Tip: I suggest adding the sugar last to your mixture because I added it first while the milk is still heating up. That’s ok, too, but if you’re not watching it (and I wasn’t) the sugar will end up caramelizing and burning at the bottom of your pan, making it hotter than you really want it to be. On the bright side, I ended up with all these really delicious flakes of burnt sugar scattered throughout my pudding. It was a lemons-into-lemonade kind of situation.

Stir in remaining 1/2 c. milk (you may want to give it a slight whisk beforehand) and beaten egg. Stir to combine and let cook for two minutes more. Remove from heat and stir in butter. Let pudding sit for 10 minutes before serving. Scatter with raspberries (or fruit of your choice.

Rice pudding can be served hot or cold, but I prefer it slightly warm because that’s when the texture feels just right. (So creamy! So vanilla-y!) If you’re not a fan of rice pudding because all you’ve had is the gelatinous, cold stuff from the grocery store, I ask you to try this recipe and reconsider. It may have a reputation as a dessert for the elderly, but I think you’ll find it’s actually delicious for all ages.

Happy baking!

B

Baking with B appears (usually) every other Monday on the Keeping Busy with B Blog. Find out why I like baking so much here. For more of my baking, click here. And for even more recipe inspiration, check out my Pinterest full of food eye candy that will have you licking your computer. Promise.

Baking with B: Chocolate Beet Cake

Aarrggh! I gave the secret ingredient away in the title already. You may wish to be less forthcoming than I have been- beets have a bad rap for being so red, so earthy-flavored, so…beet-ish. However, when they’re mixed with chocolate for some reason it just works. (I’d like to know more about the person who came up with that idea.)

I don’t often foray into baking with vegetables (except this time) that but that lonely can of beets in my cupboard (plus my friends’ insistence that it could not be done) inspired me to make a Chocolate Beet Cake and honestly? It’s kind of marvelous. Don’t trust me? Try it yourself! It’s been loosely adapted on this recipe I found here.

Chocolate Beet Cake (makes 2 9-inch round cakes)

3/4 c. butter

2 c. white sugar

3 eggs

2 1/2 c. all-purpose flour

1/2 c. cocoa powder

1 1/2 tsp baking soda

1/2 tsp salt

1 c. milk

1 14-oz. can of beets, drained and rinsed, with 1/2 c. of beet juice for reserve

1/2 c. reserved beet juice

First, you gotta puree those beets. Use your blender, slap-chop, whatever- just get ‘er done. Me, I went the old-fashioned way, simmering the beets in a saucepan on the stove until super moist before going at them with my hand-blender. Set aside beets aside.

Preheat the oven to 350F. In a medium bowl, combine flour, cocoa, baking soda and salt. In a separate bowl, cream together butter and sugar before adding eggs. Beat until thick and frothy. Slowly start adding the dry ingredients to the wet ingredients a bit at a time, alternating with the milk until fully combined.

Remember those beets? Stir them in last, then the beet juice you’ve saved from the can. Grease and flour two 9-inch round or square baking pans and pour batter into pans. Cook for about 25 minutes, or until a toothpick or a knife comes out clean when inserted.

B’s Tip: You know what they say about buying good-quality cocoa powder? Yeah, I laughed too, but I wasn’t laughing after a friend gave me some of hers to use in this cake. It honestly makes a world of difference so if you can afford it (or if it’s a special occasion) I highly recommend using the best you can find for this recipe.

Happy baking!

B

Baking with B appears (usually) every other Monday on the Keeping Busy with B Blog. Find out why I like baking so much here. For more of my baking, click here. And for even more recipe inspiration, check out my Pinterest full of food eye candy that will have you licking your computer. Promise.

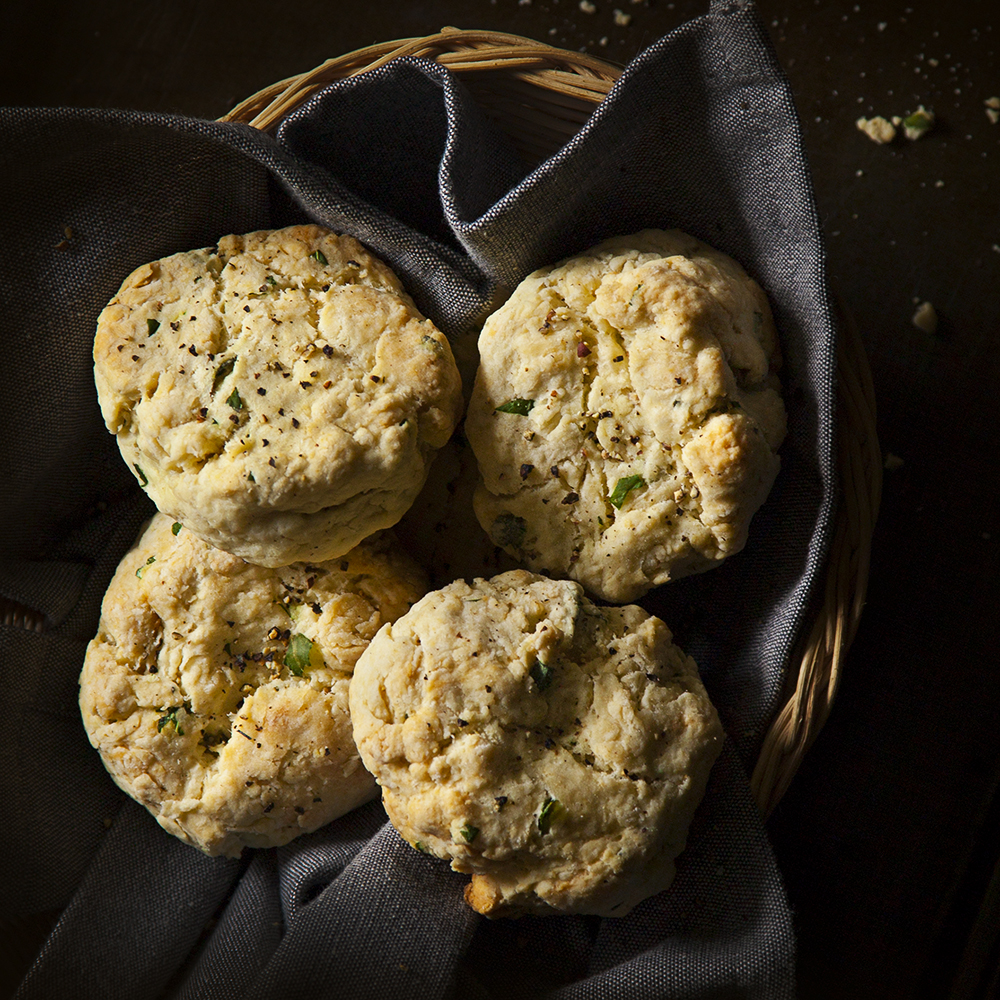
Baking with B: Garden Herb Scones

Guys, I know you think I’m all fancy-like but when I say these scones do not take up a lot of time it is the absolute truth. You’d think a treat associated with something as fussy as a tea service would be complicated but they are not. The hardest thing about baking these is going to be deciding what you’re going to put in them. I used fresh herbs from my garden (because they’re running amok, please, someone come help me) but you could put in grated cheese, raisins, nuts, dried fruits, fresh fruits…see? I told you it was going to be hard.

Garden Herb Scones (makes approx. 12)

4 tbsp butter, softened

1 egg, beaten

1/4 tsp salt

2 c. flour

1 tbsp. baking powder

5 tbsp. milk

fresh herbs, finely chopped (to taste)

Preheat the oven to 400F. Beat butter and eggs together until creamy; set aside. In another bowl, sift together flour, salt and baking powder. Add dry ingredients to the butter mixture a little bit at a time, alternating with the milk. Mix in your herbs (in this case, I used rosemary, basil and sage). Using your hands, form a ball shape then place on a baking sheet lined with parchment paper. Use your fist to flatten the tops gently, but not enough to take away that nice rounded edge. Bake in oven for about 20 minutes or until golden brown. Serve as soon as they’re cool enough to eat!

B’s Tip: Nobody’s perfect, and sometimes your measurements may be a little bit off. Adding the milk a little bit at a time allows the batter to form without getting too slimy or wet. If you find you’ve reached the perfect consistency before you’ve added all the milk, you can stop right there. Mixture still feeling a little dry? Go ahead and put it all in!

Happy baking!

B

Baking with B appears (usually) every other Monday on the Keeping Busy with B Blog. Find out why I like baking so much here. For more of my baking, click here. And for even more recipe inspiration, check out my Pinterest full of food eye candy that will have you licking your computer. Promise.
Baking with B: Cherry Vanilla Cake

It’s been quite some time since I’ve written a post about something I’ve made- and the truth is, I haven’t really been baking as much as I used to. Seeing all the fresh fruit around at this time of year, however, sparked my interest again. That, and having a friend who has a cherry pitter gave me a great deal of encouragement. (Don’t have one? I suggest you befriend someone who does, immediately.)

Cherry Vanilla Cake (serves 8-12)

2/3 c. butter, softened

4 eggs

1 1/2 c. sugar

2 tsp vanilla extract

2 1/2 c. all-purpose flour

4 tsp baking powder

1 c. milk

2 c. fresh cherries, pitted and chopped

Vanilla Buttercream Frosting

1 1/2 c. butter, softened

2 c. icing sugar, sifted

1/2 tsp vanilla extract


Preheat the oven to 350F. Melt butter, set aside. In a bowl, beat eggs and sugar until light yellow and very thick (use a mixer if you’re not brave enough to do it by hand). Stir in the vanilla. In a separate bowl, combine flour and baking powder. Add dry ingredients to the egg mixture a little bit at a time, alternating with the butter and milk. Stir until thoroughly combined. Gently stir in 1 1/2 cups of the cherries, reserving the remainder. Grease and flour two round (6-cup) cake pan. Pour batter into prepared pans and bake on low oven rack for 40-50 minutes. Let cakes rest in pan 10-15 minutes before turning them out on racks to cool.

Next, place the remaining cherries in a small saucepan and cook on low heat, 15-20 minutes, stirring occasionally until mixture resembles thick liquid (you may have to add a pinch of water or two to get the consistency needed). Remove from heat and cool.

To make buttercream frosting, beat butter until creamy and add sugar 1/2 c. at a time, until well combined. Add vanilla extract and beat until smooth.

Slice the top off of your first cake. Spread with buttercream frosting, and spoon over half of the cherry mixture. Place second cake on top and layer with the remaining frosting and cherries. Top with additional fresh cherries, if desired.

I love the combination of vanilla and cherry flavors, and using fresh cherries gives it a sweet-tart flavor instead of using something from a can. There’s so many fresh, local fruits in season though that you could swap the cherries out with virtually anything your little heart desires- this cake recipe is simple enough to support a dazzling array of flavors. This cake would be awesome served warm and as-is, but sometimes it’s nice to go the extra step.

Man, that felt good to share another baking post again. Hopefully I won’t be as long in sharing the next one!

Happy baking!

B

Baking with B appears  (usually) every other Monday on the Keeping Busy with B Blog. Find out why I like baking so much here. For more of my baking, click here. And for even more recipe inspiration, check out my Pinterest full of food eye candy that will have you licking your computer. Promise.

Baking with B: Chocolate Spice Cookies

Do you ever get tired of making the same thing, over and over again? (I used to feel that way about birthday cakes.) I was searching for something to serve during a recent family visit and none of my old standards were really grabbing me. Trying something new didn’t really appeal to me either- I didn’t have the time or energy for experimenting.

I was beginning to feel discouraged until I thought- hey, why reinvent the wheel? You know a lot of great classic recipes, B. Why not spice one up so you can have the best of both worlds?

I took my own advice. Literally. I whipped together the ingredients for my favorite butter cookie recipe (also featured here) and turned things up a notch. I’m pretty pleased with the results, too- these Chocolate Spice Cookies melt in your mouth just like a butter cookie, but taste like a gingersnap, with an extra splash of chocolate to keep things sweet.

Chocolate Spice Cookies (makes 28)

3/4 c. butter, softened

1/2 c. sugar

1 1/2 c. all-purpose flour

2 tsp. cinnamon

2 tsp. nutmeg

1 1/2 c. chocolate chips, melted

Cream together butter and sugar until well blended. In a separate bowl, sift together spices and flour and mix with wet ingredients, adding one spoonful at a time until ingredients are fully combined. Divide the dough and shape into two flat discs. Cover with plastic wrap and refrigerate for 30 minutes.

Preheat oven to 350F. Remove dough from refrigerator and unwrap. Use your hands to shape dough into desired shape, before placing on a parchment-lined cookie sheet approximately one inch apart. Press down each cookie with a fork before baking 10 minutes. Remove from oven and place on cookie rack until fully cooled.

Melt chocolate in a double-broiler or microwave until smooth. Dip each cookie halfway into the chocolate before placing on waxed paper. Refrigerate until chocolate is set.

B’s Tip: Just because I used chocolate chips doesn’t mean you can’t use your favorite baking chocolate or chocolate bar to make the melted chocolate! You may want to drizzle the chocolate over the cookies instead, or skip that step altogether and throw your chocolate chips into the dough before baking.

The best thing about making over a classic recipe like this is that the variations don’t have to stop there- you can change up the chocolate, switch out the spices, or add nuts or your favorite dried fruit for even more flavor. Your cookies don’t even have to be the same shape- I tried molding mine into logs before squashing with a giant serving fork, instead of the usual circular cookies I make. See? Spicing up your old routine can be addictive. I highly suggest you try it too. You never know what you might come up with!

Happy baking!

B

Baking with B appears every other Monday on the Keeping Busy with B Blog. Find out why I like baking so much here. For more of my baking, click here. And for even more recipe inspiration, check out my Pinterest full of food eye candy that will have you licking your computer. Promise.

Baking with B: Chocolate Pudding Brownies

Isn’t it awesome when you can take something from your cupboard normally used for one thing and then make something completely different using that same thing?

If you don’t follow, then you obviously haven’t made these Chocolate Pudding Brownies where the secret ingredient is (not surprisingly) chocolate pudding. They’re super-soft and moist and honestly do kind of taste like chocolate pudding- if you bake them right, they have that soft, smooth pudding texture that gives the recipe its name. Apologies to brownie purists everywhere-my favorite brownie recipe is still this one-but for people that are short on time and looking for simple baking solutions, this is definitely one you should add to your roster.

Chocolate Pudding Brownies (makes 25 squares)

6 tbsp butter, softened

2/3 c. sugar

2 eggs

1 tsp. vanilla extract

1/2 c. all-purpose flour

1 box instant chocolate pudding powder (4-serving size)

Preheat oven to 350F. In a medium bowl, cream butter and sugar until smooth before beating in eggs, one at a time. Add vanilla. In a separate bowl, sift together flour and chocolate pudding powder. Combine with wet ingredients just until moistened. Spread evenly in a greased 8×8-inch pan and bake for 30 minutes until pick inserted in center comes out moist, not wet, with batter.

B’s Tip: Depending on how hot or cold your oven runs, you may want to check up on these babies frequently to make sure you don’t over-bake them. They’re still pretty tasty if you do, but the texture comes out kind of gummy and spongy instead of cake-y and moist.

These brownies are so ooey, gooey good that you should wait until they cool before cutting and serving, but if you just can’t wait why not pair one with your favorite ice cream or frozen yogurt for a brownie-licious sundae? Just add whipped cream and chocolate sauce and you’re good to go! Brownie points if you top it with a maraschino cherry. (See what I did there?!)

Happy baking!

B

Baking with B appears every other Monday on the Keeping Busy with B Blog. Find out why I like baking so much here. For more of my baking, click here. And for even more recipe inspiration, check out my Pinterest full of food eye candy that will have you licking your computer. Promise.

Come Fika with Me (Again!)

I can’t believe it’s been a whole year since we last had fika together.

For those of you who are unfamiliar with the term, it’s a Swedish concept not unlike high tea in England. Instead of tea though, we usually serve strong coffee, along with a bite to eat. This could include anything from simple bread and butter, to open-faced sandwiches but traditionally is something sweet. More than just your typical 3 p.m. coffee break, it’s a time to press pause and chat with friends, or to just contemplate the events of the day.

As a baker with a semi-Swedish background, I’ve incorporated fika as much as possible into my regular routine. It’s better for you than you think! Taking the time to sit, relax and focus on your sensory experiences is restorative for your mind and also for your digestive system- having a little bit of food with your coffee can counteract the acidic, sometimes inflammatory, effects that coffee has on your stomach. Plus, I’m kind of a stress baker, so I have to some way of getting rid of all those extra sweets in my cupboard!

Ever since I started writing about my baking back in 2014, I’ve had the wonderful opportunity to share some of my favorite classic recipes with you, as well as new ones that I’ve been longing to try. Last year’s fika was a chance to feature some of my favorites from the blog, and it’s amazing how many more recipes I’ve added to my collection since then.

I even got together with some other bloggers (twice!) to round-up even more recipe inspiration, first focusing on cakes, and then sharing our most-loved cookies.

Last year’s fika also featured a listing of some the cookbooks that grace my shelves. You’d better believe my collection of titles has expanded since then!

If you find the concept of fika as appealing as I do, I hope you’ll join me this year for my second annual fika party. Today’s post is just the first of many goodies this week- I’ll also be sharing a little more about where I get my inspiration, how I develop and test my recipes for the blog, and some of the adventures I’ve had in baking along the way.

For now, though, your only task is to decide what you’re going to have for fika. Here are some of my suggestions from the past year:

These Cranberry-Almond Biscotti are perfect for dunking in your coffee, and they’re gluten-free which makes them good for you. (Kind of?)

Looking to fika but still stuck with the kids? These Peanut Butter and Jelly Cupcakes, or these Rocky Road Sour Cream Brownies are certain to pleasure sweet-tooths of all ages. Just mind any nut allergies, please.

I originally made these Date Pecan Bars for Christmas, but they pair perfectly with any hot drink any time of year, plus they’re super easy to make.

Impress your friends with this minty version of a Nanaimo bar that eliminates your need to bake, although there is some assembly required. (For more no-bake wonders, try these Butterscotch Bars, this Chocolate Roll, this Marshmallow Roll, this Pineapple Log, this Butterscotch Confetti or these S’mores Squares.)

For those of you looking for something a little less sweet, search no further than this surprisingly delicious Zucchini Bread. (You’ll have most people fooled into thinking it’s carrot cake!)

You won’t ever have to choose between sweet and salty flavors again with these addictive Pretzel Shortbread Bars.

The baking on this blog doesn’t stop there. I like to try out a new recipe out every two weeks or so, and you can find all my work archived into the following categories: cakes and pies, cookies, muffins and cupcakes, squares and loaves, and “other” (think lots of fruity surprises, and yummy candy).

And if you’re planning on throwing a festive fika for a crowd, I’ve got tips on how I bake for the masses here.

Even if you’re not a baker and you just enjoy baking, I hope you’ll join me for fika this week. We may not know each other but we’ve bonded already over our love of food, and it’s always a good excuse to kick back, relax, and enjoy some great company. Thanks for joining me!

KBwB-BFlower-50

Do you fika, or have you incorporated a particular aspect of it into your everyday life? Email me at keepingbusyb@gmail.com and tell me everything- including how you like your coffee.

Or maybe you want to join in on the party too so leave your comments below along with a link to your favorite recipe, or one of the best featured on your blog! The more the merrier!

Baking with B: Blueberry, Lemon and Coconut Trifle

Let’s ease back into this baking thing a little bit, shall we? It’s been a while. I know trifle isn’t exactly “baking” in the traditional sense, but I wanted to share this with you because I made it not once, but twice in the last few weeks. Yes, it was that good.

The best thing about trifle is that you can’t really screw it up. Everyone has their own version, and it doesn’t always turn out the same way every time. Basically each trifle is made up of similar building blocks (cake, fruit, custard, whipped cream) but that’s pretty much where the similarities end. I happen to think that this blueberry-lemon-coconut combo is a fresh and modern take on this traditional dessert. (Plus, I love anything blueberry-lemon flavor.)

Put some time aside for this one: even though it’s a snap to make, assembling the layers requires work, plus you want this baby to chill in the fridge for at least four hours to get everything all blended, gooey and good. Don’t let that put you off- your patience will be rewarded in the form of this awesome dessert.

Blueberry, Lemon and Coconut Trifle (makes about 14 c.)

10 1/2 oz. pound cake (thaw if using frozen)

1 can lemon pie filling (19 oz. or about 540 mL)

1 1/4 c. flaked coconut

2 c. frozen blueberries

3 c. whipped cream

In a large frying pan, toast coconut over medium heat, stirring constantly until lightly golden. Remove from heat and put 1/4 c. aside. Mix the remaining coconut in a small bowl with the lemon pie filling.

Cut the pound cake into approx. 1″ cubes. Arrange half into the bottom of an extra-large glass bowl (or in my case, an enormous jar I had lying around the house), and set the other half aside. Next, take half of your pie filling, and spread over your cake layer evenly. Create the next layer by sprinkling the pie filling with blueberries. Spoon whipped cream over blueberries until covered. Lay down another cake layer, followed by another pie filling layer, followed by the remaining whipped cream. Sprinkle with reserved coconut. Chill in the fridge, covered, for at least 4 hours.

B’s Tip: You can substitute whipped cream for your favorite brand of frozen whipped topping, but be sure to thaw it first before using it in the trifle.

And because this dessert knows no bounds, I urge you to modify the recipe however you like- I know I have! So far I’ve used less coconut in the filling and sprinkled more on top (pretty!); I’ve bought whipped cream, and I’ve whipped my own (store-bought is sweeter!); and I’ve even used different types of blueberries (wild ones have way more flavor!)

What’s in your trifle?!

B

Baking with B appears every other Monday on the Keeping Busy with B Blog. Find out why I like baking so much here. For more of my baking, click here. And for even more recipe inspiration, check out my Pinterest full of food eye candy that will have you licking your computer. Promise.

Baking with B: Rocky Road Sour Cream Brownies

_mg_0826

I confess I used to be one of those people that scoffed at the idea Valentine’s Day. Like those other haters, I believed it was too commercialized, and I resented feeling excluded all of those years I was single on February 14.

As I’ve gotten older and found it more difficult to keep up with all of my personal relationships, I’m starting to realize those greeting card companies might be onto something. There just aren’t a lot of opportunities for romance amidst today’s hustle and bustle unless you make the time for it. Sure, ideally you’d like to show your partner your appreciation every day, but now I think there’s something to be said for putting aside a day once a year for doing something special.

That’s why I’m starting to think Valentine’s Day is really for those in long-term relationships- those relationships that are filled with chores and kids and bills and all those other wonderful things life throws your way as an adult. Those couples need a day like this. They need a way to make things extra-special.

Kind of like these brownies. My chocolate brownies are kind of a staple in my household, and yet when do I ever get the opportunity to jazz them up a little? Valentine’s Day seemed like the perfect excuse to bake this ooey-gooey, junked-up version. The result? A brownie that’s perfect for your favorite chocoholic, or for anyone that you want to feel special.

Rocky Road Sour Cream Brownies (makes 25)

Brownie Base:

1/2 c. butter, melted

1 c. sugar

1/2 c. flour

1/3 c. cocoa

1/4 tsp baking powder

1/4 tsp salt

1/2 c. sour cream

Rocky Road Topping:

1/2 c. milk or semi-sweet chocolate chips

1/2 c. mini marshmallows

1/2 c. slivered almonds

Preheat oven to 350F. In a medium-sized bowl, cream together butter, sugar and vanilla. Beat in eggs one at a time until frothy, then use a spoon to add sour cream and mix well. In a separate bowl, combine flour, cocoa, baking powder and salt. Stir dry ingredients into wet ingredients until fully combined. Bake in a greased 8-inch pan for approximately 35 minutes.

Remove brownies from oven and sprinkle chocolate chips, marshmallows and almonds (in that order) over top, taking care to distribute evenly. Return to the oven and bake for 5-10 minutes more, or until marshmallows get puffy and golden. Let the brownies cool at least 10-15 minutes before cutting.

B’s Tip: The sour cream brownie base makes these treats really soft at first, so it’s based to wait until brownies are just about cool for the cleanest, neatest cuts. But who am I kidding? Chocolate is chocolate, and these taste good pretty much any which way.

Happy baking!

B

KBwB-Flower-50Baking with B appears every other Monday on the Keeping Busy with B Blog. Find out why I like baking so much here. For more of my baking, click here. And for even more recipe inspiration, check out my Pinterest full of food eye candy that will have you licking your computer. Promise.