Baking with B: Blueberry, Lemon and Coconut Trifle

Let’s ease back into this baking thing a little bit, shall we? It’s been a while. I know trifle isn’t exactly “baking” in the traditional sense, but I wanted to share this with you because I made it not once, but twice in the last few weeks. Yes, it was that good.

The best thing about trifle is that you can’t really screw it up. Everyone has their own version, and it doesn’t always turn out the same way every time. Basically each trifle is made up of similar building blocks (cake, fruit, custard, whipped cream) but that’s pretty much where the similarities end. I happen to think that this blueberry-lemon-coconut combo is a fresh and modern take on this traditional dessert. (Plus, I love anything blueberry-lemon flavor.)

Put some time aside for this one: even though it’s a snap to make, assembling the layers requires work, plus you want this baby to chill in the fridge for at least four hours to get everything all blended, gooey and good. Don’t let that put you off- your patience will be rewarded in the form of this awesome dessert.

Blueberry, Lemon and Coconut Trifle (makes about 14 c.)

10 1/2 oz. pound cake (thaw if using frozen)

1 can lemon pie filling (19 oz. or about 540 mL)

1 1/4 c. flaked coconut

2 c. frozen blueberries

3 c. whipped cream

In a large frying pan, toast coconut over medium heat, stirring constantly until lightly golden. Remove from heat and put 1/4 c. aside. Mix the remaining coconut in a small bowl with the lemon pie filling.

Cut the pound cake into approx. 1″ cubes. Arrange half into the bottom of an extra-large glass bowl (or in my case, an enormous jar I had lying around the house), and set the other half aside. Next, take half of your pie filling, and spread over your cake layer evenly. Create the next layer by sprinkling the pie filling with blueberries. Spoon whipped cream over blueberries until covered. Lay down another cake layer, followed by another pie filling layer, followed by the remaining whipped cream. Sprinkle with reserved coconut. Chill in the fridge, covered, for at least 4 hours.

B’s Tip: You can substitute whipped cream for your favorite brand of frozen whipped topping, but be sure to thaw it first before using it in the trifle.

And because this dessert knows no bounds, I urge you to modify the recipe however you like- I know I have! So far I’ve used less coconut in the filling and sprinkled more on top (pretty!); I’ve bought whipped cream, and I’ve whipped my own (store-bought is sweeter!); and I’ve even used different types of blueberries (wild ones have way more flavor!)

What’s in your trifle?!

B

Baking with B appears every other Monday on the Keeping Busy with B Blog. Find out why I like baking so much here. For more of my baking, click here. And for even more recipe inspiration, check out my Pinterest full of food eye candy that will have you licking your computer. Promise.

Baking with B: Andi’s Gluten-Free Cranberry Almond Biscotti

19cranorangebisc-final

Andi is a neighbor of mine and one of the people that I admire most in this world: she carries herself with such poise and grace that it almost makes me envy her; and you’d hate her for how smart, beautiful and accomplished she is except that she’s so kind-hearted you kind of have to love her anyways.

So when I was making my neighbors some goody bags for Christmas, I felt badly for excluding Andi because of her gluten-free diet. She’s always lamenting that she never gets to try any of the things that I make, so I decided it was time to make her something of her own.

Having not ever made biscotti before-combined with being unfamiliar with many of the GF flours out there- made me a little bit nervous. The results were golden and a little bit spicy, but for some reason retained a slightly chewy texture in the middle that was decidedly delicious, but decidedly un-biscotti like. (Psst. Here’s the part where you email me with your gluten-free, biscotti-making advice.)

Still, I liked them enough to try them again and include them in my baking repertoire. The almond flour gives it an even nuttier flavor that’s not too sweet, and it goes perfectly with a strong Italian espresso.

Andi’s Gluten-Free Cranberry Almond Biscotti (makes 12)

(based on a recipe I originally found here)

2 large eggs

1/3 c. honey

zest from one orange

1 1/2 c. almond flour

2 tbsp arrowroot flour

1/2 tsp baking soda

1/4 tsp sea salt

1/2 c. dried cranberries

1/2 almonds, sliced

In a medium bowl, combine eggs, honey and orange zest and beat until frothy. Add flours, baking soda and sea salt to the bowl and mix until a dough forms. Add cranberries and almonds and stir to combine.

Spoon out dough onto a parchment-lined cookie sheet and use fingers to shape it into a long rectangle, approximately 4×12 inches. (B’s Tip: The dough will be sticky, gooey and hard to manipulate so you can always use the back of a spoon that’s been dipped in cold water to help shape your rectangle.) Make sure to leave room on all sides as the dough will spread as it cooks.

Bake dough in oven that’s been preheated to 350F for approximately 20 minutes or until golden. Remove from the oven and let cool for 1 hour. Once cooled, slice your log on a diagonal to get those long, angular biscotti shapes (about 1″ thick). Lay biscotti on their sides and return to oven for an additional 15-20 minutes until crunchy.

B’s Tip: Believe me, it’s hard to wait for the biscotti to cool before slicing them but trust me- they’re much easier to slice if you do and they need that drying-out time to get that crunchy consistency. Make the process go faster by placing your cookie tray on a raised cooling rack to get the air flowing underneath it, and keep them far away from your warm oven!

Happy baking!

B

KBwB-Flower-50Baking with B appears every other Monday on the Keeping Busy with B Blog. Find out why I like baking so much here. For more of my baking, click here. And for even more recipe inspiration, check out my Pinterest full of food eye candy that will have you licking your computer. Promise.

Baking with B: 7 Days of Christmas Treats: Butterscotch Confetti

19bfp7cookies2-cookie1

This recipe is probably one of the easiest recipes I’ve ever made on my blog, and definitely one of the prettiest. I’m not always a fan of butterscotch chips- sometimes I find them just way too sweet- but when you throw in salty peanut butter and fluffy marshmallows the result ends up sleek and smooth, and melts in your mouth. The only challenging part of this recipe is going to be preventing yourself from eating all of these babies before the holidays arrive.

Butterscotch Confetti (makes 36)

1/4 c. butter or margarine

1/2 c. peanut butter

1 c. butterscotch chips

8 oz. small colored marshmallows

Melt butter and peanut butter in a large saucepan over low heat. Stir in chips until melted. Cool until you can hold your hand on bottom of pot. To speed process, stir while holding pan in cold water until cool enough. Add marshmallows and stir until all are coated. If you like, add 1/2 c. chopped walnuts and/or 1/2 c. medium coconut to mix things up and add a little bit of bite. Pack down in a 9×9-inch pan that has been lined with wax paper. Refrigerate for up to two weeks in an airtight container.

B’s Tip: The original recipe calls for a 9×9-pan but you may want to experiment with different sizes and shapes of pans to create a shape that works best for you. Honestly? I would have preferred a thicker square and may try using an 8×8-inch pan next time.

Happy baking!

B

KBwB-Flower-50

Last year I counted down to Christmas by baking seven different types of Christmas cookies as per my favorite Swedish holiday tradition. This year I’m making it a thing, and sharing seven more delicious recipes with you. This is the last post in this year’s series, but for more inspiration, you can check out more of my baking here. For even more recipe inspiration check out my Pinterest full of food eye candy that will have you licking your computer. Promise.

Baking with B: Classic Chocolate Fudge

Everyone should know how to make chocolate fudge, everyone, because it’s one of those recipes that seems way harder than it actually seems. All of your friends will be impressed by your super-awesome candy-making skills and you’ll get the satisfaction of knowing you made a sweet treat in less time then it will take you to burn off the calories from one piece.

Classic Chocolate Fudge (makes 64 squares)

500 g. (about 3 ½ c.) best quality dark, milk or white chocolate, coarsely chopped

300 mL can sweetened condensed milk

Line the bottom and sides of a 8×8-inch pan with 2 overlapping pieces of plastic wrap, letting wrap half over sides of pan. Combine chocolate and milk a large microwave-safe bowl. Microwave, uncovered, on medium setting halfway through until chocolate is almost melted, 3-4 minutes. Remove and stir until evenly mixed and smooth. Scrape mixture into prepared pan and press down, smoothing top. Fold overhanging ends of plastic wrap over fudge to completely cover. Refrigerate at least 2 hours or overnight. Fudge keeps well, refrigerated, for up to 1 week.

Happy baking!

B

KBwB-BFlower-50Baking with B appears every other Monday on the Keeping Busy with B Blog. Find out why I like baking so much here. For more of my baking, click here. And for even more recipe inspiration, check out my Pinterest full of food eye candy that will have you licking your computer. Promise.
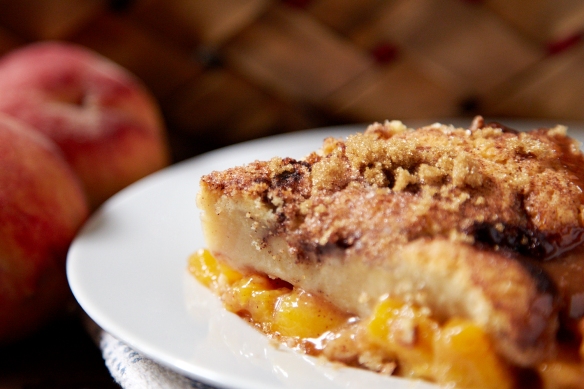
Baking with B: Peach Cobbler

13BFP-PeachCobbler-1500

Let’s just all agree on one thing: peaches are the best. Sure, they’re great any time of year but when they’re in season there’s no way I’m going to junk up the flavor of a fresh peach by hiding it in some cake or square. No, I want my peaches sweet and juicy and I want them now in this cobbler, showcased just the way they were meant to be.

Peach Cobbler

8 fresh peaches – peeled, pitted and sliced into thin wedges

1/4 cup white sugar

1/4 cup brown sugar

1/4 teaspoon ground cinnamon

1/8 teaspoon ground nutmeg

1 teaspoon fresh lemon juice

2 teaspoons cornstarch

1 cup all-purpose flour

1/4 cup white sugar

1/4 cup brown sugar

1 teaspoon baking powder

1/2 teaspoon salt

6 tablespoons unsalted butter, chilled and cut into small pieces

1/4 cup boiling water

For the topping:

3 tablespoons white sugar

1 teaspoon ground cinnamon

Preheat oven to 425F. In a large bowl, combine peaches, 1/4 cup white sugar, 1/4 cup brown sugar, 1/4 teaspoon cinnamon, nutmeg, lemon juice, and cornstarch. Toss to coat evenly, and pour into a 2 quart baking dish. Bake in preheated oven for 10 minutes. Meanwhile, in a large bowl, combine flour, 1/4 cup white sugar, 1/4 cup brown sugar, baking powder, and salt. Blend in butter with your fingertips, or a pastry blender, until mixture resembles coarse meal. Stir in water until just combined. Remove peaches from oven, and drop spoonfuls of topping over them. Sprinkle entire cobbler with the sugar and cinnamon mixture. Bake until topping is golden, about 30 minutes.

Happy Baking!

B

KBwB-BFlower-50Baking with B appears every other Monday on the Keeping Busy with B Blog. Find out why I like baking so much here. For more of my baking, click here. And for even more recipe inspiration, check out my Pinterest full of food eye candy that will have you licking your computer. Promise.