Baking with B: Chocolate Banana Cookies

KBB_baking_chocolate_banana_cookiesYou guys, I have the solution for banana bread boredom- you know, when you use so many overripe bananas you start to get sick of baking with them? (I know right? How could you get sick of banana bread? Or these banana muffins.)

Enter the chocolate banana cookie, the cookie that tastes like chocolate cake, with just a hint of banana flavor. This cake-like cookie even has the stamp of approval from my co-worker Lucy who, to the best of my knowledge, has never consumed a piece of fruit. Like ever.

Try these! They’re easy and yummy and I promise you’ll never feel like you’re in a rut baking with bananas again.

Chocolate Banana Cookies (yields 60)

1 c. margarine or butter, softened

1 c. brown sugar, packed

2 large eggs

1 tsp vanilla

1 c. mashed banana

2 1/2 c. all-purpose flour

1/2 c. cocoa

2 tsp baking powder

1/2 tsp baking soda

2 tsp ground cinnamon

1 1/2 c. milk chocolate chips (optional)

Cream margarine and brown sugar together in large bowl until light and fluffy. Beat in eggs and vanilla until well blended. Add banana. Beat well until mixed.

Combine flour, cocoa, baking powder, baking soda and cinnamon in a medium bowl. Gradually add to banana mixture until well blended.

If desired, add chocolate chips. (This is highly desired.) Stir until evenly distributed. Drop by level tablespoonfuls onto greased cookie sheet. Bake in 350F oven for about 14 minutes.

Happy baking!

B

KBwB-Flower-50

Baking with B appears every other Monday on the Keeping Busy with B Blog. Find out why I like baking so much here. For more of my baking, click here. And for even more recipe inspiration, check out my Pinterest full of food eye candy that will have you licking your computer. Promise.

Baking with B: Classic Vanilla Cupcakes

KBB_baking_vanilla_cupcakesMy friend Melissa is all about doing cupcakes right. For Valentine’s Day she made these insane raspberry-filled cupcakes that were dipped in chocolate and smothered in frosting. Even looking at her Instagram feed makes me gain five pounds. She’s kind of like my cooking mentor in the sense that she always comes up with fabulous taste combinations and meal-planning ideas that would put Martha Stewart to shame.

That’s a big thing for me to admit. I’m obsessed with Martha Stewart.

This particular baking session we decided to take the classic route and make some simply delicious vanilla cupcakes with pink frosting because, of course, it’s Melissa and we had to. But once you’ve mastered this recipe, the possibilities for variations on it are endless. Please experiment with all of the flavors. We dare you too!

Classic Vanilla Cupcakes (makes 36)

3 c. cake flour (not self-rising), sifted

1 ½ c. all-purpose flour

2 ¼ tsp baking powder

1 ½ tsp coarse salt

¾ tsp baking soda

9 oz. (2 sticks plus 2 tbsp) unsalted butter, softened

2 ¼ c. sugar

5 large eggs plus 3 large yolks, room temperature

2 c. buttermilk, room temperature

2 tsp pure vanilla extract

Preheat oven to 350F. Line standard muffin tins with paper liners. Whisk dry ingredients in a large bowl and set aside. In another bowl, cream butter and sugar until light and fluffy. Add eggs, 1 at a time, beating after each addition. Mix remaining wet ingredients in a separate bowl. Add dry ingredients to butter mixture in 3 additions, alternating with wet ingredients and ending with dry. Scrape sides of bowl. Divide batter among muffin cups, filling each 2/3 full. Bake cupcakes until testers inserted into centers come out clean, about 20 minutes. Let cool in tins on wire racks. Cupcakes will keep, covered, for up to 3 days.

Happy baking!

B

KBwB-Flower-50

Baking with B appears every other Monday on the Keeping Busy with B Blog. Find out why I like baking so much here. For more of my baking, click here. And for even more recipe inspiration, check out my Pinterest full of food eye candy that will have you licking your computer. Promise.

Wanna know more about turning this recipe into a cake? Read out about how I did it here. Baking cupcakes for a crowd? I’ve got tips on how to do it here.

My Other Mission in Life

For those of you who know me in real life (read: not from the inter-webs) you’ll know that I’m not the only busy B in my family!

KBB_blogging_sistersThat’s L. my little sister. She’s got a hot little fashion blog that she started back in 2010. I’m so excited to share that after a brief (but heartbreaking) hiatus, Mission Fashionable is back and it’s better than ever!

dsc_0377

This blog is a great outlet for me to share the things that make running my business, my home and my life easier. Fashion isn’t something I talk about often, and dressing myself in a way that suited my personality and body type was something with which I always struggled.

It wasn’t until I started working at a small women’s fashion boutique in the east end of Toronto that I became familiar with the satisfaction that comes with helping other people (in this case, mainly women) feel good. Selling clothing became not so much about the color of the piece or whom it was designed by, but how much it did for the buyer’s complexion, figure and self-esteem. Women of all shapes and sizes would torment themselves isolating faults as small as the faintest knee dimple, and even the most beautiful, smartly-dressed women had issues with their bodies that the rest of us mortals would not be able to understand. It was easier to relate to other people and build selling relationships the more apparent it was that we suffered from the same issues.

Mission Fashionable is not a blog about telling you what the trends are, or how they are supposed to be worn. It’s about finding creative ways to cultivate your own sense of style, whether you have the budget to shop every day and experiment with trends, or if you’re simply looking to freshen up your wardrobe with a few key pieces. Most of what I know about dressing myself comes from my experience shopping with sister. L. has personally helped me through so many style crises that I’d recommend her blog for anyone who wears clothes- from the most experienced, stylish dresser to the nerdiest yearbook editor who can’t get out of her jeans-and-sweater rut (yes, that was me circa 2004).

Of course while you’re checking out her blog you’ll also have to check out my awesome photography skills, pictured here:

hpim00351I mean, I know my sister is stunning, but it’s my photography that makes the difference, right? Right?

Check out Mission Fashionable (I highly recommend Bloglovin if you’re interested in a good system for organizing all your blog feeds) and see why I’m making such a big fuss. You can also follow L on Twitter and Facebook for more style and shopping tips. Maybe if you say pretty please she’ll be willing to do a style consultation for you.

Don’t believe in the awesome powers of L? She made me look like this, people. Like this. This is my glamour shot.

IMG_5263I think I should go into modeling. Seriously. Especially seeing as this was supposed to be a very serious corporate headshot photo shoot. Then again, maybe I should stick to my day job.

KBwB-Flower-50

Have you visited L’s site yet? Do it now! Got the clothes and just need the organizing? I talk about some of my closet organizing solutions here.

Cleaning Out My Closet

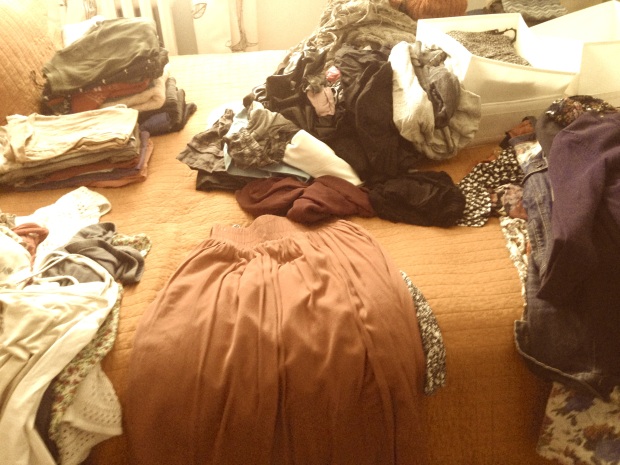
KBB_mess_of_clothesIt was getting to the point where I couldn’t close my drawers. I couldn’t even get dressed in the morning. I had had enough.

It was time to follow in the footsteps of Eminem, and begin cleaning out my closet. Literally speaking- I’m not so sure how I feel about that metaphorically.

Ideally, editing your closet is something you should do regularly. I like having garbage bags or laundry hampers at hand to use for sorting, extra hangers, and a pen and paper for jotting any notes. Make sure you’re near a mirror!

Put on your favorite radio station or make a fashion show mix for your iPod. Pour yourself a glass of wine, dim the lights- why not invite a close gal pal for a second opinion?

Make sure you have a clean space on your floor or bed and get started! If you’re overwhelmed, start small– choose to empty one drawer, or start big by emptying all the things off your hangers. Then it’s just a matter of going through every piece of clothing you own. Don’t forget your laundry basket! (Just remember to put the dirty stuff back afterwards.)

I like to stick to one major rule: nothing goes back into your drawer or closet unless you are absolutely sure you want to keep it.

The stuff that doesn’t go back into your closet can be divided into two piles:

The discard pile should include things that you’ve outgrown, shrunk, and are stained, ripped or faded. (That includes any socks or underwear!) Check your clothes for funky odors. Retire anything you haven’t worn in a year or more. Try things on and be honest with yourself about what looks good. If the cut or color of something isn’t flattering, or doesn’t make you feel beautiful, it can find a better home elsewhere.

Sort as quickly as you possibly can to avoid lingering over decisions. When you’re done, stick the discard pile into bags to be donated- because that’s what you’re doing instead of throwing out your clothes. Right? RIGHT?

I also have a “pending” pile. It usually includes anything that I like that needs mending, as long as the repair is feasible and I’m willing to devote time to fixing it (or the money to pay someone else to).  If I have multiples of one type of item, I usually throw them on the “pending pile” too so that I can come back to them for re-evaluation.

Really try to keep only the things you’d use, or you’ve promised yourself to use. If your wardrobe seems to be missing certain staples, or you find yourself letting go of basic wardrobe items that need replacing, jot them down.

At the end of my cleaning frenzy, I was left with five shopping bags of donations, and a list of the gaps in my wardrobe so the next time I go shopping, I know what to look for and where to cut myself off.

And I can close my drawers.

KBwB-Flower-50

How did your last closet organization session go? Got any tips and tricks for us people who like to hoard a crazy amount of T-shirts like I do? Drop me a line at keepingbusyb@gmail.com and tell me how you got your closet from bomb-site to bombshell. Want tips from our fashionistas for wardrobe basics that will help flush out even the most label-starved lady? My sister L writes a great fashion blog that has tons of practical tips on how to incorporate the fashionable into any wardrobe.

Baking with B: Classic Sugar Cookies

KBB_baking_sugar_cookiesThere’s no recipe collection that’s complete without the quintessential cookie: the sugar cookie. Honestly, there’s no way you could go wrong with these babies. Decorate them like crazy, or leave them plain to dip in your coffee. Cookie cutters come in virtually every shape these days, so get creative! I have a set of different flower cookie cutters that I love using in the spring and summer, but I’m also definitely digging my woodland creatures that came in a set at IKEA.

Classic Sugar Cookies (makes 2 dozen)

2 c. all-purpose flour

1/4 tsp salt

1/2 tsp baking powder

1/2 c. unsalted butter

1 c. sugar

1 large egg, lightly beaten

2 tbsp brandy or milk

1/2 tsp vanilla extract

Whisk together flour, salt and baking powder in a bowl. In another bowl, cream together butter and sugar. Working with small amounts at a time, add the dry ingredients to the wet ingredients mixing until incorporated. Add egg, brandy and vanilla and mix until smooth.

Shape dough into two discs, cover with plastic wrap and refrigerate for at least an hour.

Preheat oven to 350 degrees. Line baking sheets with nonstick baking mats or parchment paper. Set aside.

On a lightly floured work surface, roll out dough to 1/8-inch thickness. Cut into desired shapes and transfer to prepared baking sheets, leaving an inch in between each cookie. Bake until lightly golden, about 10 minutes; do not allow to brown. Transfer to cooling rack and enjoy!

B’s Tip: Cutting cookies often take much longer than the actual baking. Prepare two or three batches of cookies in advance, and use the time in between taking them in and out of the oven to prep any decorations you’d like to use and for clean up.

You can stick to icing, or you can go all out with sprinkles. Or take a more sophisticated route and dip half of the cookie into a chocolate ganache. Place on waxed paper to harden.

Happy baking!

B

KBwB-Flower-50

Baking with B appears every other Monday on the Keeping Busy with B Blog. Find out why I like baking so much here. For more of my baking, click here. And for even more recipe inspiration, check out my Pinterest full of food eye candy that will have you licking your computer. Promise.


Baking with B: Double Trouble Chocolate Chip Cookies

Remember how Lucy’s cake was “chocolate chocolate”? Well, these cookies are like her cake’s little brothers- all cakey, and gooey and sprinkled throughout with melt-in-your-mouth-chocolatey-chip-goodness.

Why are they double the trouble, you ask? Because they disappear from your kitchen in double the amount of time of any cookie I have ever made, ever. That’s why after I popped them out of the oven, I grabbed a stack of cookies and a glass of milk and high-tailed it out of there. They may not even make it off of the cooling rack. Seriously. I barely had time to take this picture.

KBB_baking_double_chocolate_chip_cookiesDouble Trouble Chocolate Chip Cookies

1 c. butter

¾ c. brown sugar

¾ c. granulated sugar

2 eggs

1 tsp vanilla

2 ¼ c. all-purpose flour

1/3 c. cocoa

1 tsp. baking soda

2 c. chocolate chips

In large bowl, cream butter with both sugars until light and fluffy. Beat in eggs one at a time. Add vanilla. In smaller bowl, sift flour with cocoa and baking soda. Stir together well. Stir flour mixture into butter mixture until blended. Stir in chocolate chips. Drop batter by teaspoons onto greased and lightly floured or parchment paper-lined cookie sheets. Bake in preheated 375 oven 8-10 minutes. Cool on racks.

Happy baking!

B

KBwB-Flower-50

Baking with B appears every other Monday on the Keeping Busy with B Blog. Find out why I like baking so much here. For more of my baking, click here. And for even more recipe inspiration, check out my Pinterest full of food eye candy that will have you licking your computer. Promise.


Baking with B: Chocolate Chip Cookies

KBB_baking_chocolate_chip_cookiesI am notorious for making batches upon batches of these and then giving them away because I can’t stand to have all of these tasty cookies in my house just waiting to be eaten. I used to make them for parties and have enough left over for goody bags I would shove into my guests’ protesting hands. Christmastime inevitably involves giving away tins of these dipped in chocolate, or covered in almonds, or peppered with peanut butter chips. They’ve been used in care packages, at art shows, as housewarming presents and as going-away presents. It’s because they’re simply the best chocolate chip cookie ever, and I will seriously fight you on that. But my mouth will be full of cookies. Just saying.

Chocolate Chip Cookies (makes 30-34 cookies)

1 1/8 c. flour

1/4 tsp. baking soda

1/2 tsp. salt

1/2 c. butter

1/4 c. brown sugar, plus some for garnish

1/2 c. white sugar

1 egg, beaten

1 tsp. vanilla

½ c. chopped walnuts (optional)

1 c. semisweet chocolate chips

In a medium-sized bowl, cream together butter and sugars. Add vanilla and egg. Beat until creamy. In a separate bowl, sift flour, baking soda and salt. Add into wet ingredients. Fold in chocolate chips. Roll into teaspoon-sized dollops on a greased baking sheet. Bake your cookies at 350F for approximately 10 minutes, or 20 minutes for crispy cookies.

Happy baking!

B

KBwB-Flower-50

Baking with B appears every other Monday on the Keeping Busy with B Blog. Find out why I like baking so much here. For more of my baking, click here. And for even more recipe inspiration, check out my Pinterest full of food eye candy that will have you licking your computer. Promise.

When Those Lists Keep Adding Up

KBB_stack_of_filingAlmost everyone I know has a to-do list. Think about yours. It could be on a piece of paper, scrunched in a corner of your daily agenda, or neatly outlined on your Smartphone. Maybe it’s just in your head as you scramble to get out the door to do your errands.

No matter what form, we all have our ways of prioritizing all of the things we need to do in order to keep our businesses, homes or lives in order.

Now I want you to think about your list. If you’re like most people, your list is probably a mile long. You’re bound to forget one of those things, or worse: you might put it off.

Thought about that list? Great. Now ask yourself, what’s the one thing that’s been on here forever? What do I just keep forgetting? What to-do just seems to keep on slipping through the slats? You might have to dig a little deeper to think of that one thing but once you have it, grab onto it mentally and don’t let go.

Is this an exercise in procrastination? (No. I was going to write a post about that but I think I’ll just do it later.) It’s actually proof of something that I’ve only learned very recently.

To-do lists don’t work.

Now don’t immediately start composing that nasty email to me, because to-do lists have helped out a ton of people, myself included. But all too often we fall into the trap of using a to-do list as a brain dump. We write down every single little thing we’ve ever thought of doing ever, instead of just keeping it short, sweet and limited to a certain category of things.

People familiar with the practice of GTD (Getting Things Done) will remember how creator David Allen suggests organizing several to-do lists in order of context.

I have to admit that had been something that has helped me tremendously. My lists are shorter and I am much more selective about each of the items that go on each list.

This doesn’t mean you have to become a hardcore GTD convert in order to gain something from this practice. The next time you write down a to-do list for all of the errands you need to run on Saturday morning, limit the things you need to do to just that Saturday morning. If it’s not an errand, don’t add it to the list. If you do, you run the risk of losing your memory’s grip on that item and the task will never be completed. Not much of a to-do list, right?

It may seem like common sense, but you’d never include items to pick up at the grocery store on a list of things to do to clean your garage. So why would you do any of that to your to-do lists?

Try at least grouping your to-dos into like categories. You may even want to try separating those to-do lists by context, rooms in your house, or by home improvement projects. Whatever floats your boat!

Who knows? You might actually end up getting some of those nasty tasks crossed off.

KBwB-BFlower-50How many items do you have on your to-do list? I’d love to hear about yours as well. Drop me a line at keepingbusyb@gmail.com or comment below. Together let’s get them done! Looking for other projects to keep you busy? I’ve been sharing all of mine here.

Baking with B: Banana Cupcakes with Cinnamon Frosting

KBB_baking_banana_cupcakesI normally don’t get weekends off so when I do happen to get two days of vacation in a row (it doesn’t happen often!) I try to cram as much in my schedule as humanly possible. Isn’t it funny that we use our vacation time to get things done?

So when I woke up yesterday morning and realized something had to be done with the rapidly ripening bananas in my fruit basket, I was feeling kind of frustrated and bored with everything. The solution? Whip up something a little extra-special to brighten my mood.

Banana Cupcakes with Cinnamon Frosting (yields 12)

(based loosely on the recipe found here)

1 1/2 c. all-purpose flour

1 tsp baking powder

1/2 tsp baking soda

pinch of salt

3/4 c. butter, melted

3 ripe bananas, mashed (for a total of about 1 1/2 c.)

2 large eggs

1 tsp vanilla extract

Preheat your oven to 375F. In a medium bowl, whisk together dry ingredients. Make a well in the bowl and slowly add in wet ingredients one at a time, stirring just until blended. Line a 12-muffin pan with liners. Slowly use a spoon to pour even amounts of butter in each muffin cup. Bake in the middle rack for twenty minutes.

B’s Tip: Wait until the cupcakes are completely cool before frosting, or you can end up making a runny, sticky mess with the icing.

Cinnamon Frosting

(again, loosely based on the recipe found here)

1/2 c. butter, softened

1 1/4 c. icing sugar

1 tsp ground cinnamon

1 tsp cream

Cream together butter and sugar. Add in the cinnamon; stir until completely blended. Add just enough drops of cream until it can be stirred into a smooth consistency.

The cinnamon in this frosting gives it enough of a spicy kick in the pants to cut the sweetness so you can enjoy the subtle yum of the banana cake part underneath. So far I’ve made these babies twice, and there have been no survivors.

Happy baking!

B

KBwB-Flower-50

Baking with B appears every other Monday on the Keeping Busy with B Blog. Find out why I like baking so much here. For more of my baking, click here. And for even more recipe inspiration, check out my Pinterest full of food eye candy that will have you licking your computer. Promise.
Feeling ambitious? I’ve got more cupcake recipes here, and I share my method on how I make them for the masses here.

Baking with B: Butterscotch Brownies with the Boys

KBB_baking_butterscotch_browniesI’ll be the first to admit that I’m not really a beer person but when I invited a couple of my dude friends over for some long-awaited catching up a few months back, serving beer seemed like the natural thing to do.

Of course because I had not seen them in a long time some baked goods were requested and although I was tempted to go to my usual standby (I swear I have this recipe memorized), I decided to go with something a little more caramel in flavor and decided to serve these.

Best served when warm, these butterscotch brownies (although some people call them blondies- not sure there’s a difference?) are gooey and chewy and some of my friends and family members even prefer these to traditional chocolate brownies. Who knew?

As to whether or not they go with beer, well the verdict is out. Maybe we drank too much beer to notice. But if you’re in the mood for a gooey treat, these will win. Every time.

Butterscotch Brownies (yields 12)

1/4 c. butter or margarine

1 c. brown sugar, packed

1 egg

1/2 tsp vanilla

3/4 c. all-purpose flour

1 tsp baking powder

1/4 tsp. salt

1/2 c. chopped walnuts (optional)

Melt butter in saucepan and add it to sugar in bowl. Stir. Add egg and vanilla and stir. Measure in flour, baking powder, salt and nuts. Mix well. Spread in greased 8×8 (20 x20 cm) pan. Bake in 350F oven for 30 minutes or until sides show signs of pulling away from the pan.

Icing:

2 tbsp butter/margarine

1/4 c. brown sugar, packed

2 tbsp milk

1 c. icing sugar

Combine first 3 ingredients in saucepan. Bring to boil and simmer 2 minutes. Remove from heat. Cool. Add icing sugar and stir well. Add more icing sugar or milk as needed to make a smooth spreading icing. Frost brownies. Cut into 25 squares.

Guys, I didn’t even ice them this time. They’re that good all by themselves! Honestly, I have some friends and family members say that they prefer these over chocolate brownies. As if!
Chocolate anything is still number one in my heart, but if you’ve never tried these before you gotta make them. Maybe you’ll change your mind!

Happy baking!
B

KBwB-Flower-50

Baking with B appears every other Monday on the Keeping Busy with B Blog. Find out why I like baking so much here. For more of my baking, click here. And for even more recipe inspiration, check out my Pinterest full of food eye candy that will have you licking your computer. Promise.